Category Archives: Trending Searchs

footer_hidden

Shopify Store Integration Tutorial


Note:

1. You should have one Shopify store to get started.

2. A platform can only authorize one store. If you want to authorize a new store on the same platform, you need to delete the previously authorized store.

Step 1: Sign up for a free account on POPCUSTOMS

Sign up for a free account by using your Email address or social media accounts.image.png

Step 2: Go to this website: https://apps.shopify.com/popcustoms, and click “Add app” to install our App.

1b20195143f3137d1131b84f2a46856.png

Step 3: Log in to your Shopify account

0016234371be0bc908b70a61650463d

Step 4: Click “Install app”.

0016234373ad6aec9cb256d9403cbca

Step 5: Click “Continue” to authorize.

0016234376120004b8be6833c769223

Step 6: Confirm the connection to complete the authorization.

00162e8df3cade86004e1b4e3adea22

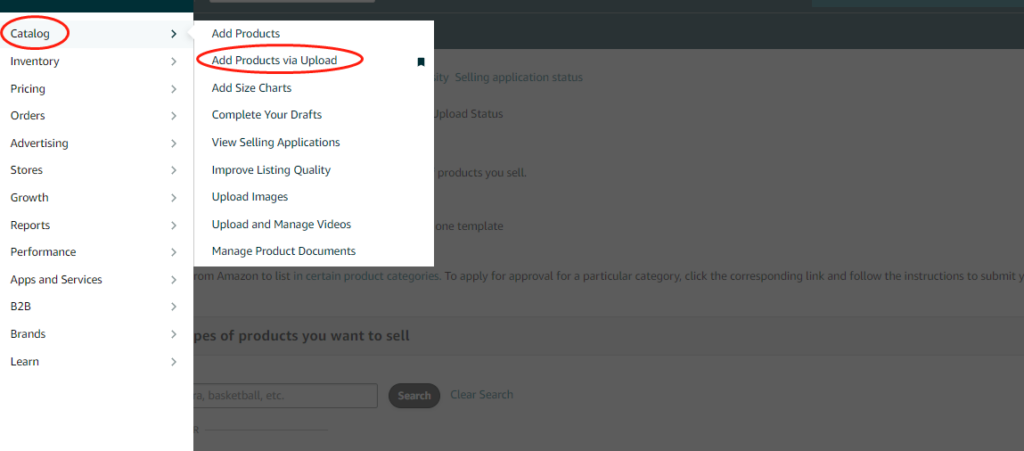
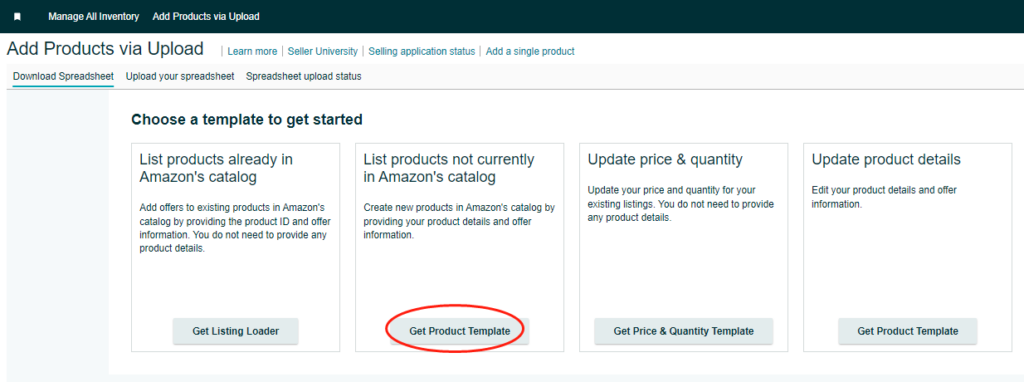
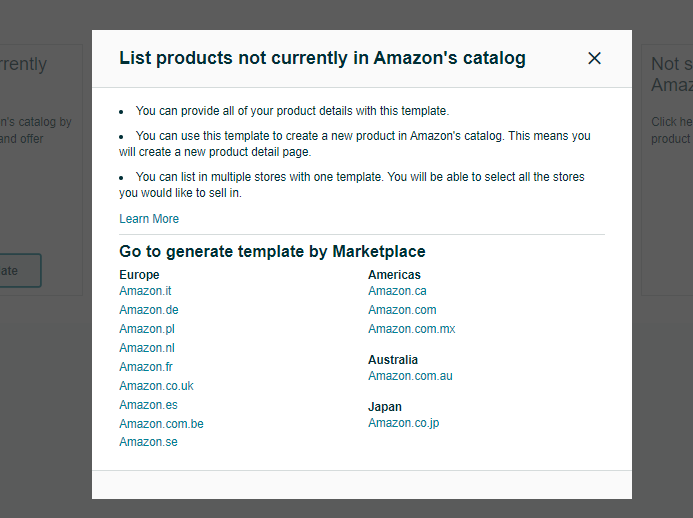
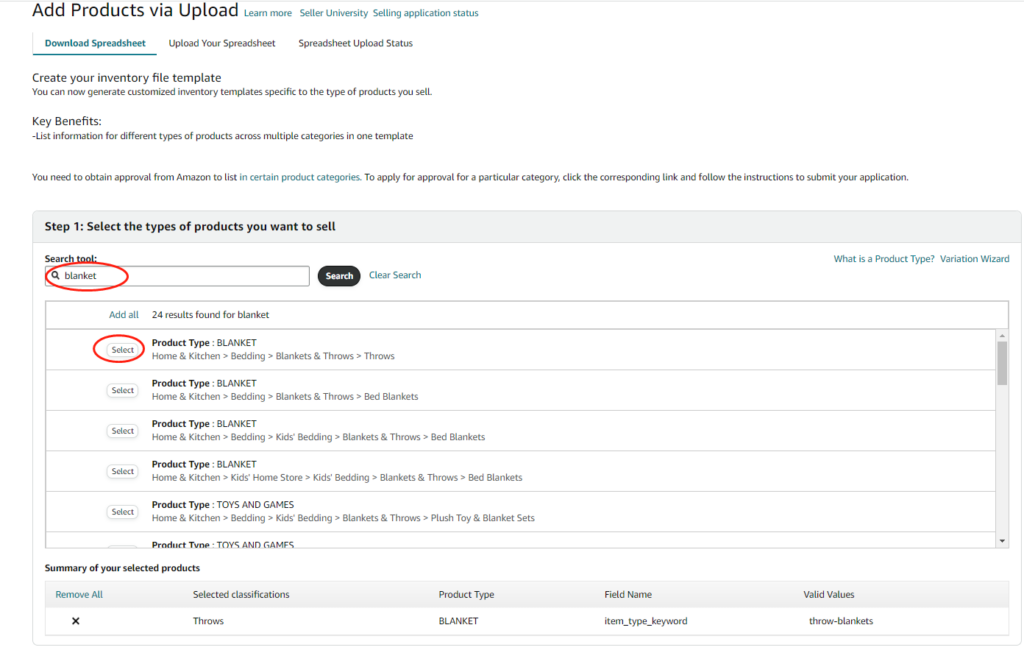
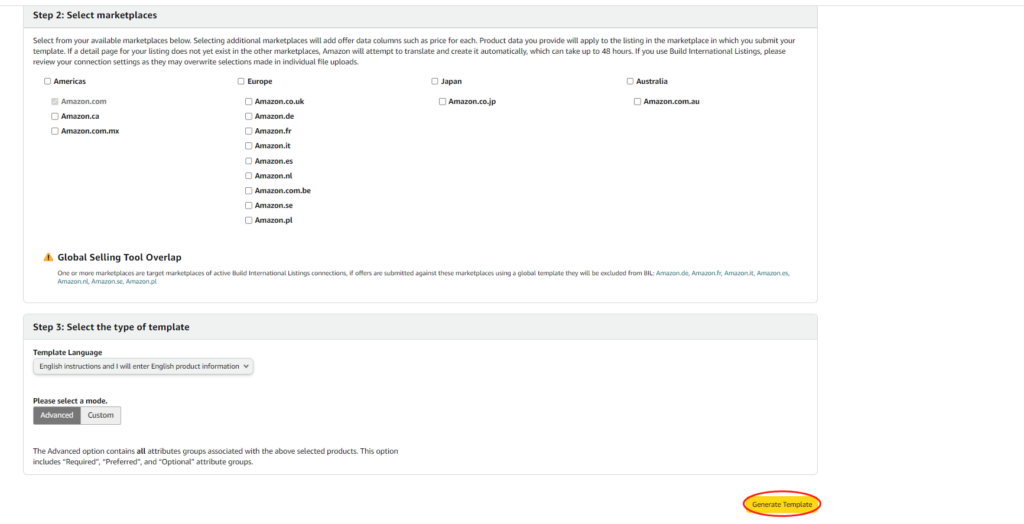
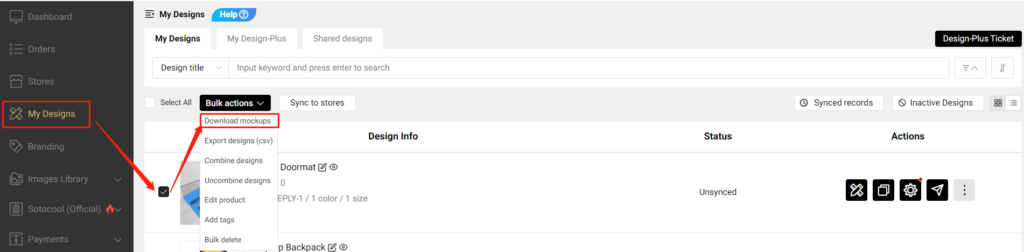
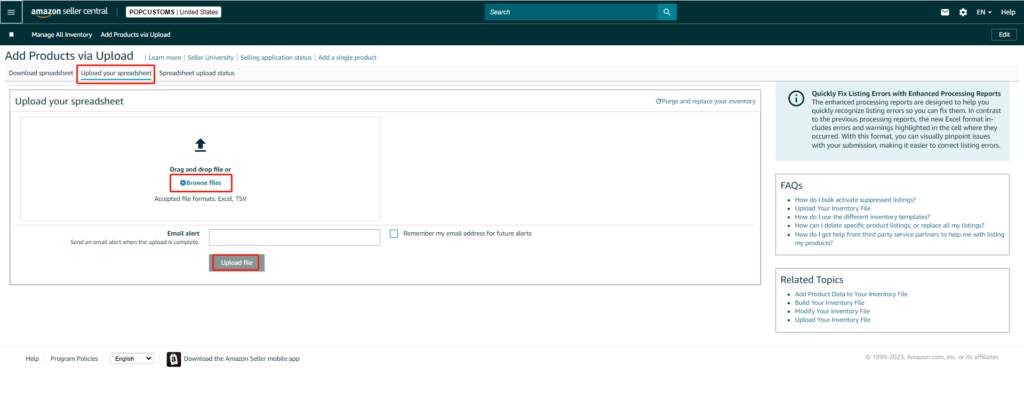
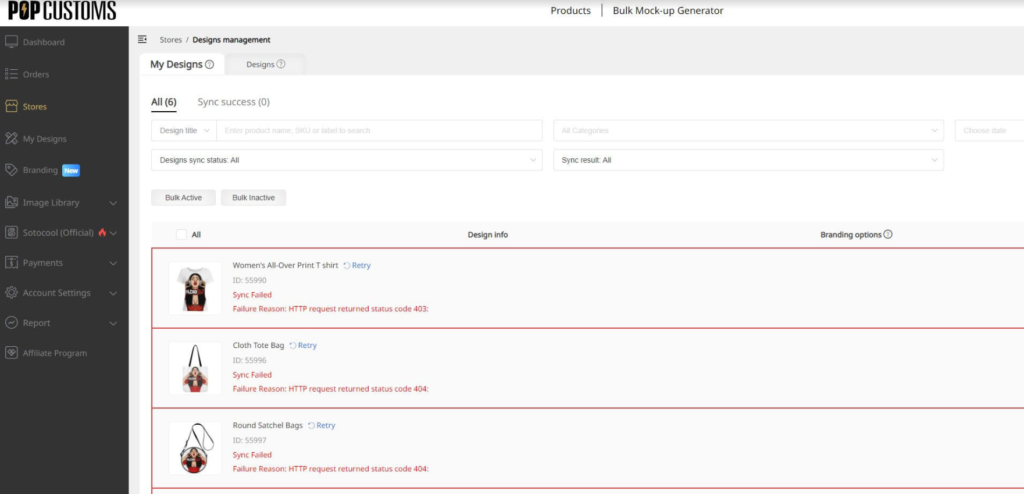
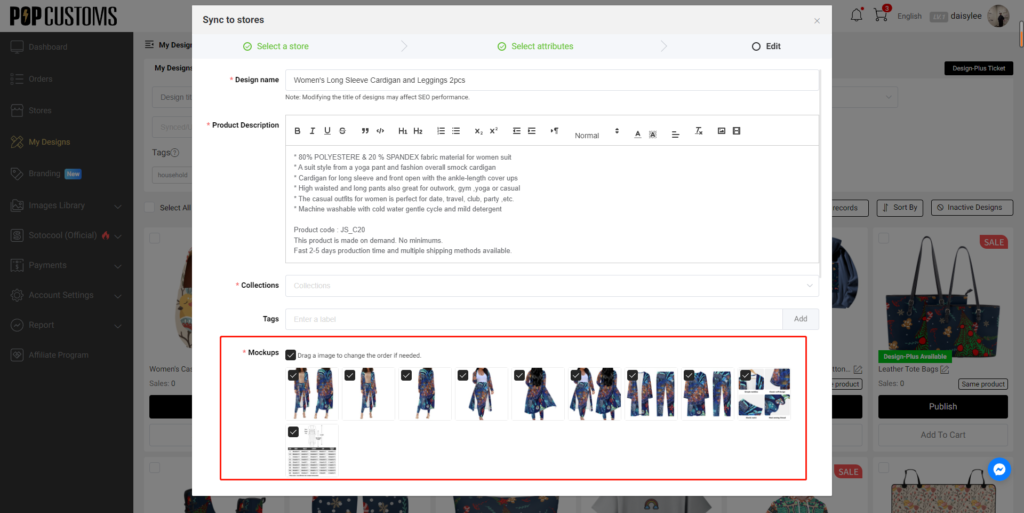
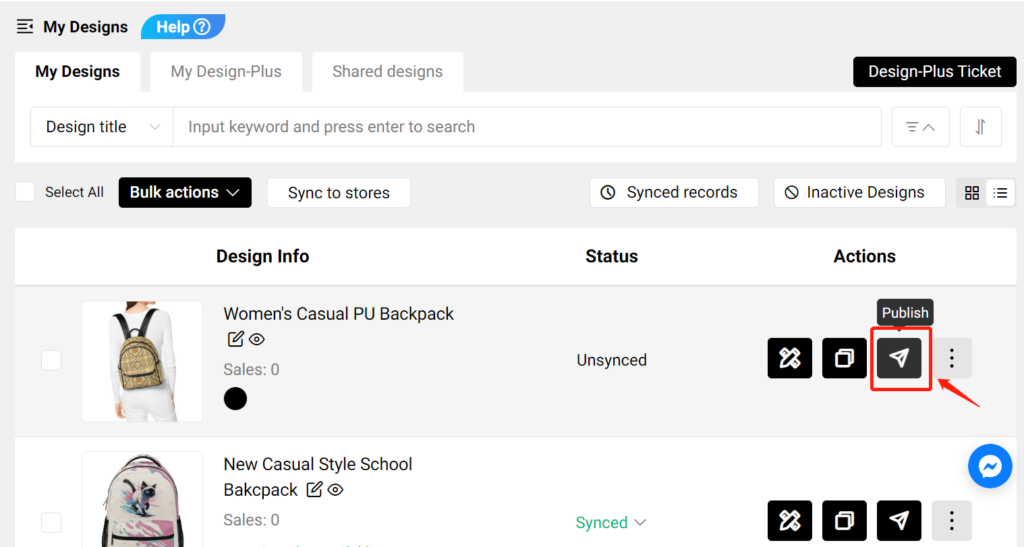
Step 7: Add your products

To accept orders and make money you need to publish products to your Shopify store. On POPCUTOMS, you can just click Products on the Dashboard page to design and add products conveniently.

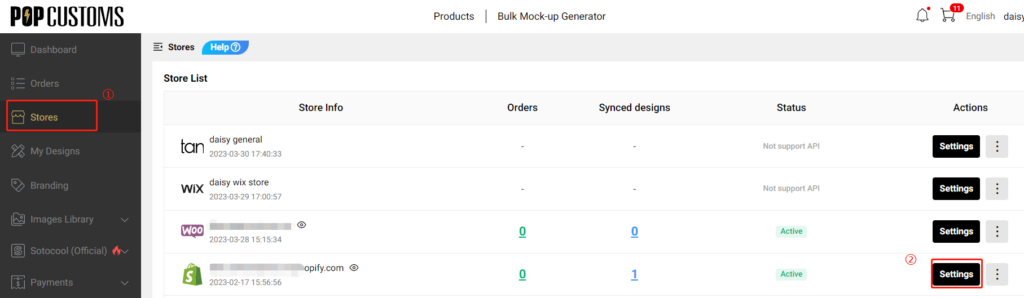
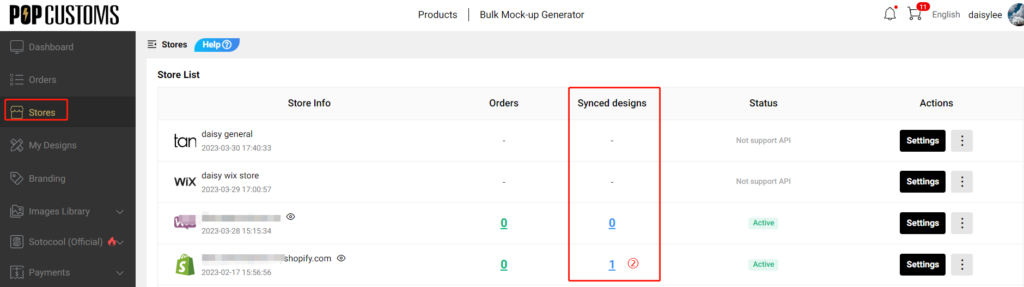
Step 8: Complete the Store settings after connection, including 

1. Basic settings

2. Sync settings: ① Currency; ② Estimated profit rate; ③ Product status

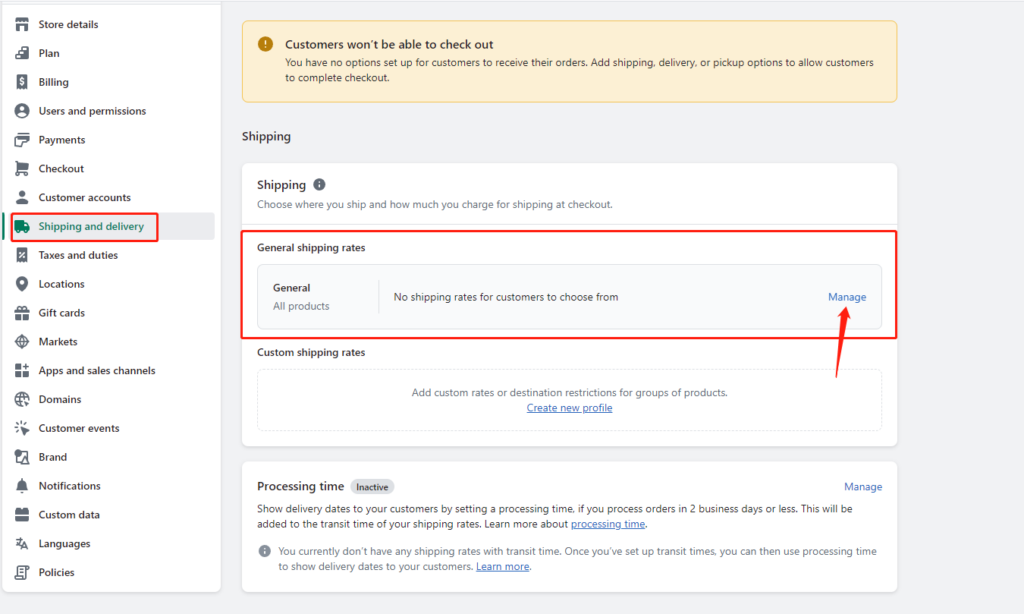
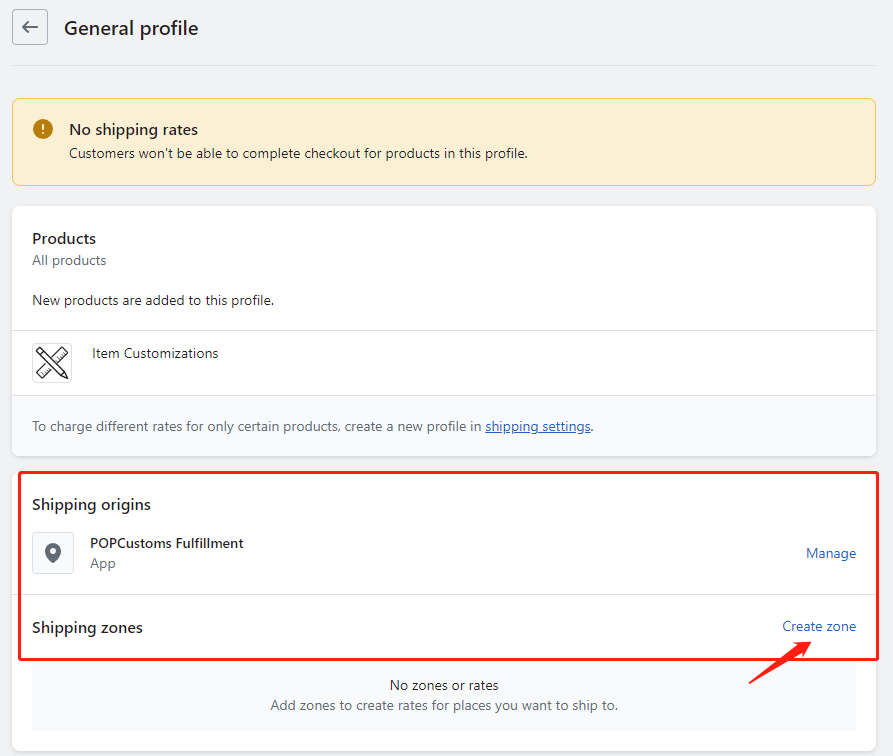
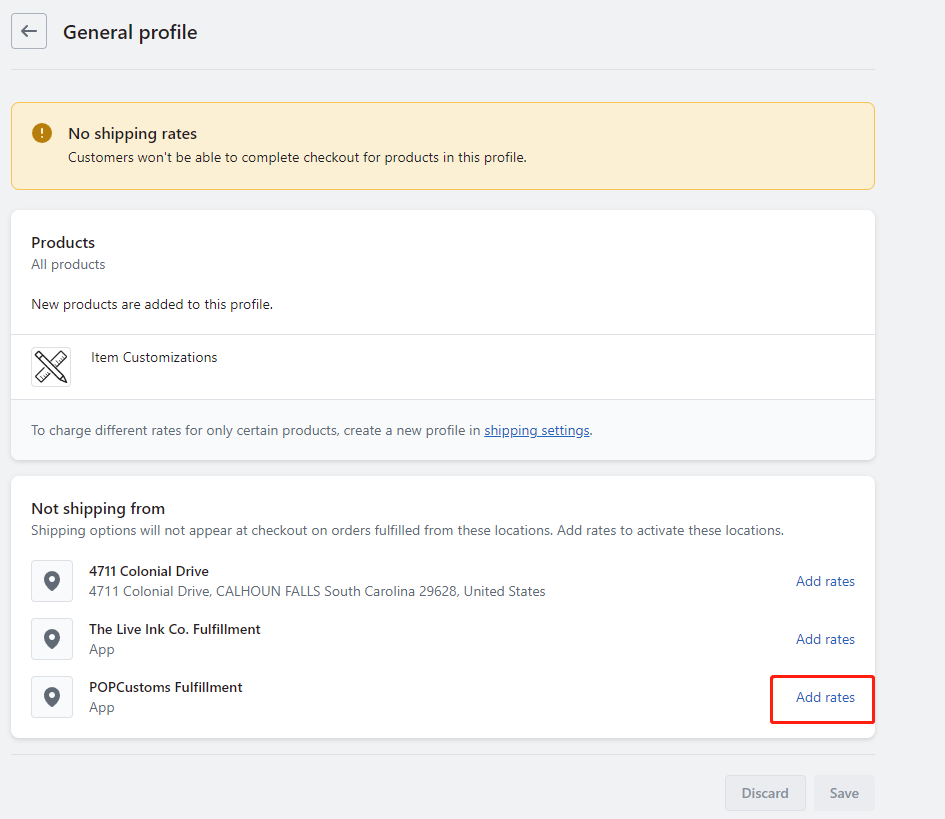
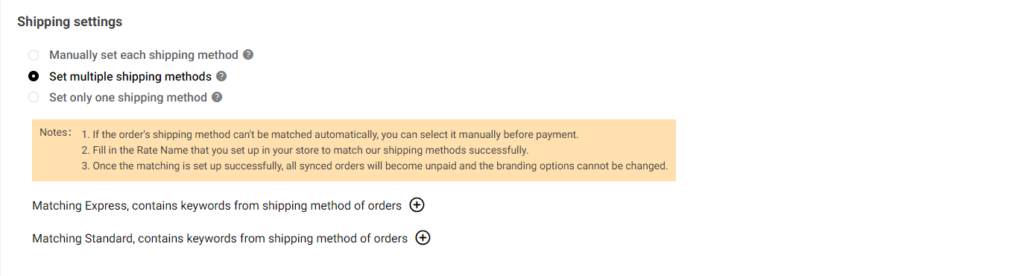
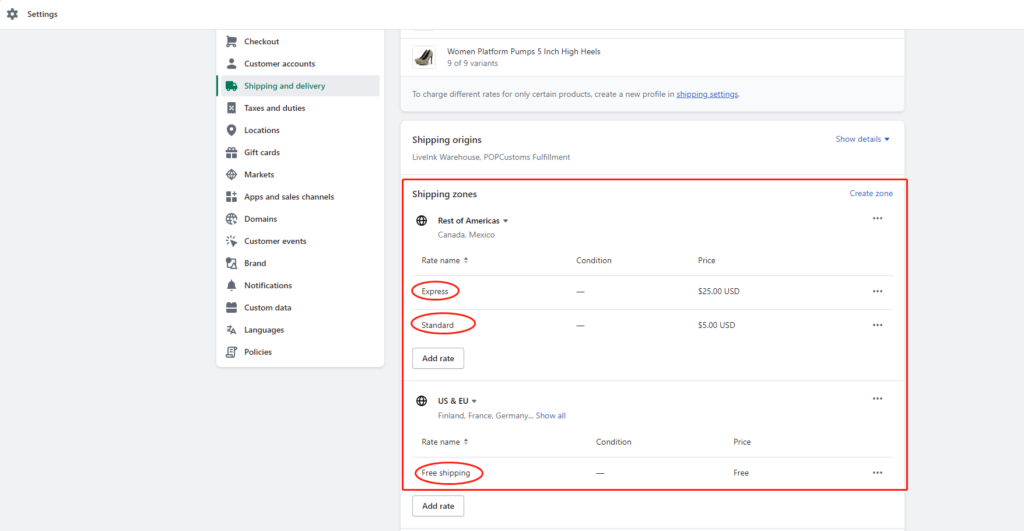
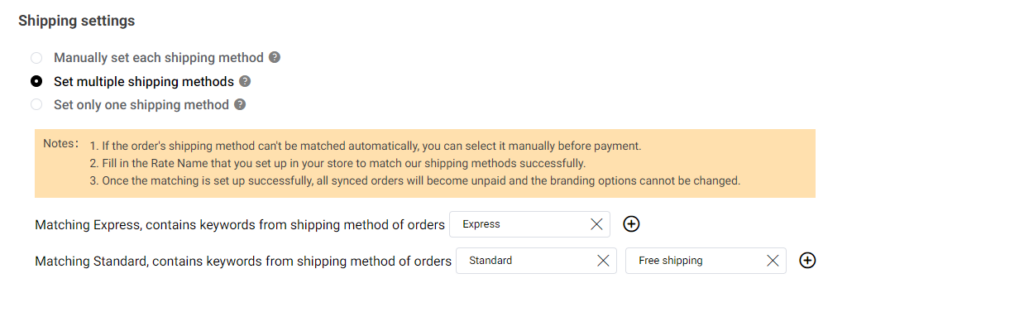
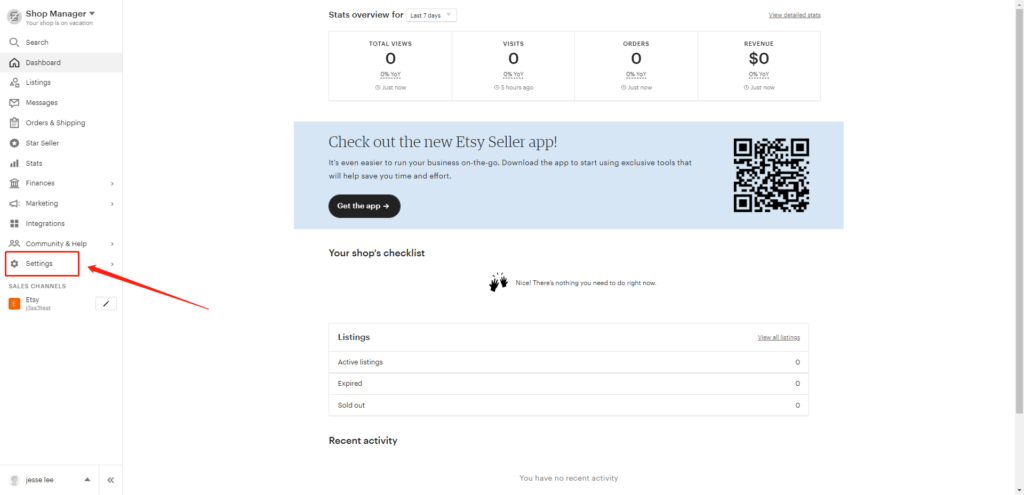
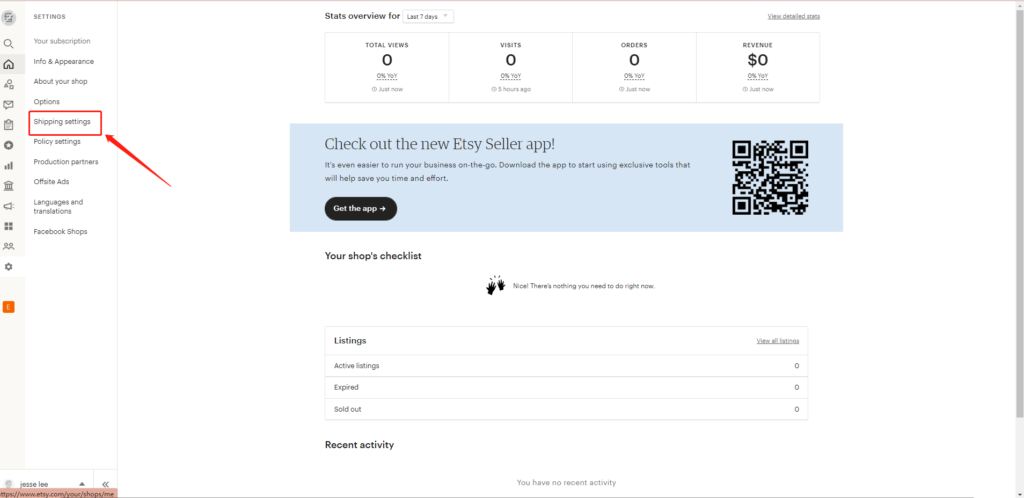
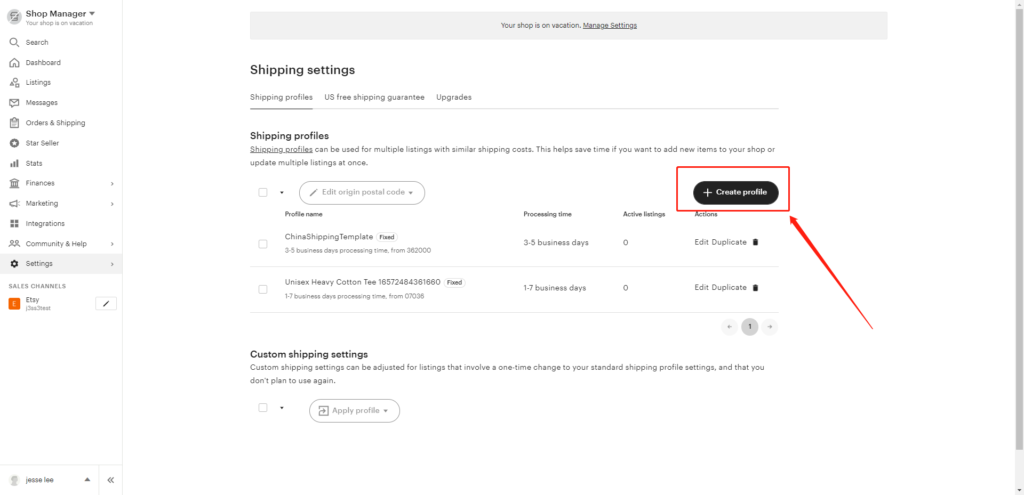
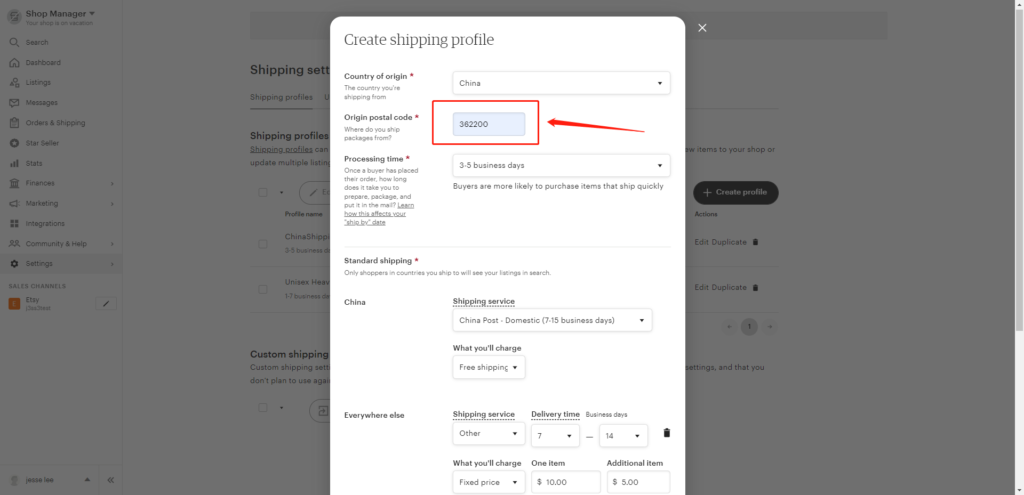
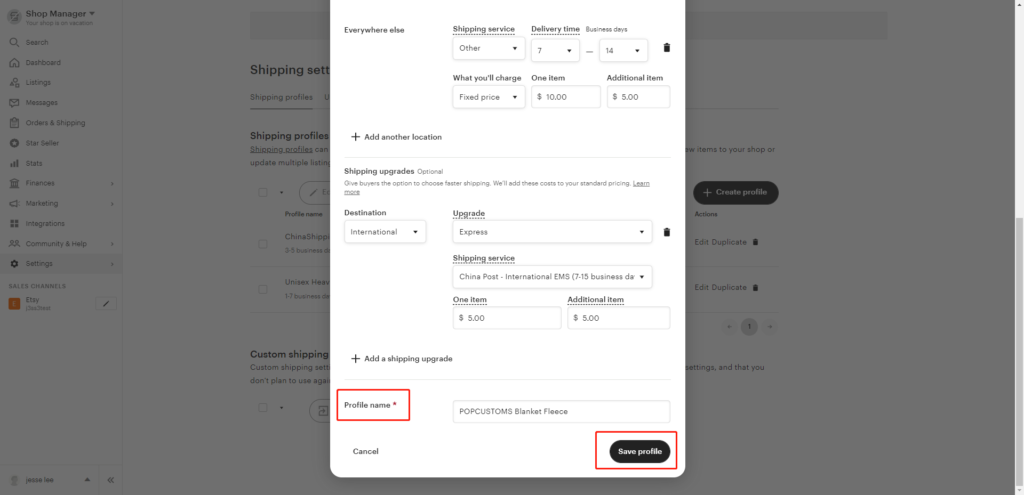
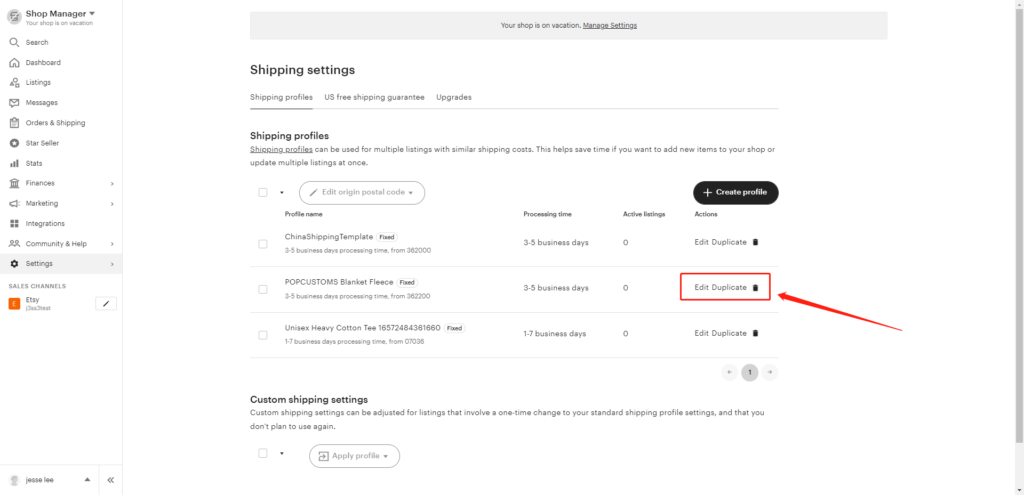
3. Shipping settings

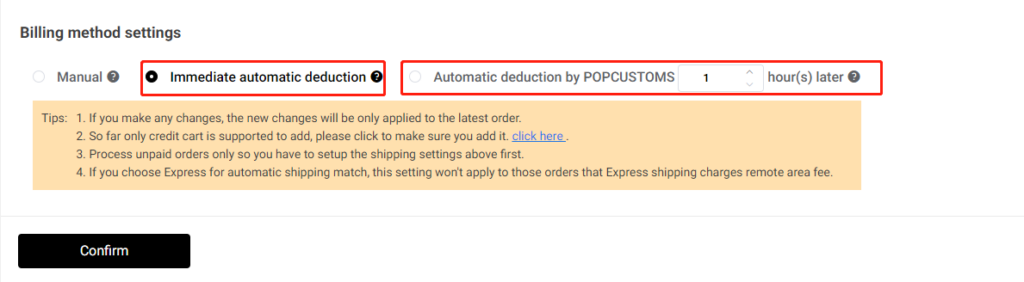
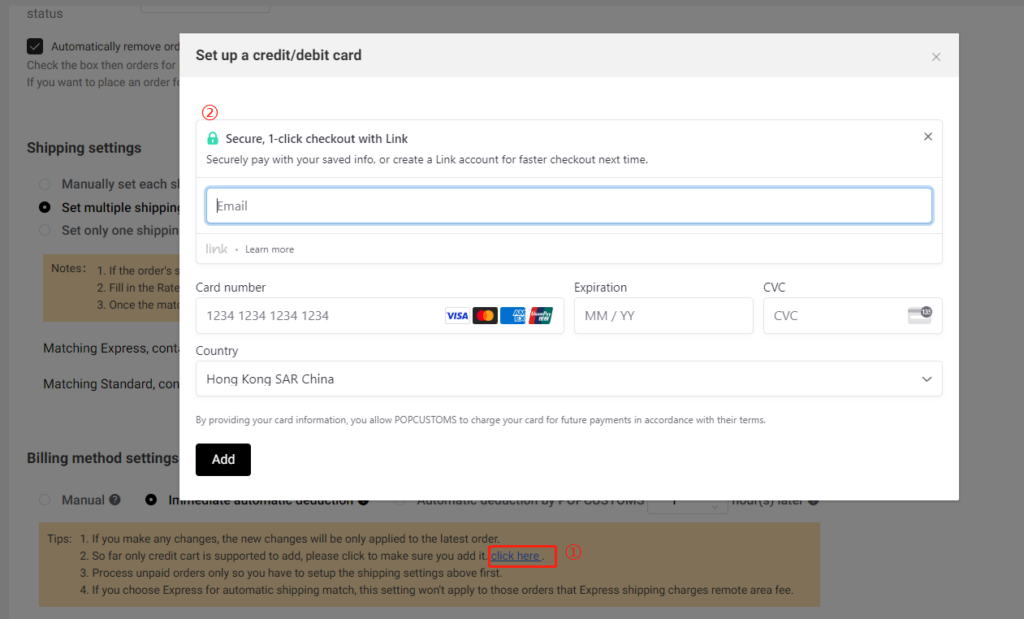
4. Billing method settings

Click the guide to check.

That’s all!

Note: Your Shopify orders will now be automatically imported into POPCUSTOMS.

Q: How to set up shipping rates for POPCUSTOMS products in my Shopify store?

It’s essential to note that POPCUSTOMS currently offers a shipping rate of $0.00 for products shipped to the United States, which means the prices displayed on the website include free shipping for that region. You can also configure shipping rates for other countries and regions based on POPCUSTOMS’ shipping policies.

And pls kindly note that if shipping rates are not set up, there may be display issues with out of stock/sold out after product synchronization.

Here’s a guide to help you set up shipping rates for POPCUSTOMS products in your Shopify store.

Step 1: Access Shipping Settings

  1. Go to your Shopify admin page. From the left-hand menu, click on the Settings option.
  2. Then, click on Shipping and Delivery.
Shipping and delivery – General – Manage

Step 2: Create or Edit Shipping Zones

  1. In the Shipping and Delivery page, locate the Shipping Zones section.
  2. If you already have shipping zones created, select the one you wish to edit. If not, click the Create Shipping Zone button.

Step 3: Set Up Shipping Rates

  1. In the shipping zone area, look for the option to Add Rate.
  2. Click on the Add Rate button.

Example Setup:

  • United States:
    • NameFree Shipping to the U.S.
    • Rate$0.00 (since POPCUSTOMS offers free shipping to the U.S.)
  • Mexico:
    • NameShipping to Canada
    • Rate$3.00 (set according to POPCUSTOMS’ policy)
  • European Union:
    • NameShipping to EU
    • Rate$0.00 (set according to POPCUSTOMS’ policy)
  • Other Regions:
    • NameShipping to Other Countries/Regions
    • Rate$9.99 (set according to POPCUSTOMS’ policy)
  • Download POPCUSTOMS’ product shipping rates to help you set up better shipping rates!

    Step 4: Save Changes

    After confirming all your shipping rate settings, don’t forget to click the Save button in the upper right corner to save your changes.

    Step 5: Test Shipping Calculation

    Once you’ve completed the setup, it’s a good idea to conduct a test:

    1. Simulate a purchase in your Shopify store.
    2. Add a POPCUSTOMS product to your cart and proceed to the checkout page.
    3. Double-check that the shipping rates display correctly based on the selected region.

    Step 6: Sync with POPCUSTOMS

    Make sure you sync your product information and shipping rates with POPCUSTOMS to avoid any discrepancies:

    1. Log in to your POPCUSTOMS account.
    2. Ensure that your shipping-related settings are updated in your Shopify product sync records.

    POPCUSTOMS Shipping Zone Information

    For more details about POPCUSTOMS shipping zones, please visit this link: POPCUSTOMS Shipping Zone.

    Please feel free to contact us at business@popcustoms.com if you need any assistance.

    Etsy Store Integration Tutorial

    Note:

    1. Please follow all the steps below to authorize.

    2. A platform can only authorize one store. If you want to authorize a new store on the same platform, you need to delete the previously authorized store.

    Step 1: Sign up for a free account on POPCUSTOMS

    Click the Sign up button in the right upper corner to sign up for a free account first.

    Step 2: Authorize POPCUSTOMS Etsy application

    ① Go to Dashboard -> Stores and click the Connect button under Etsy to authorize the connection between your Etsy store and POPCUSTOMS account.

    image.png

    ② Log in with your Etsy account and click the “Grant access” button to authorize.

    00162e8d4eeed770bb8971647d8d17d

    Step3:Add products and publish them to your Etsy store

    To accept orders and make money you need to publish products to your Etsy store. On POPCUTOMS, you can just click Products on the Dashboard page to design and add products conveniently.

    Step 4: Complete the Store settings after connection, including

    一. Basic settings

    二. Sync settings: ① Currency; ② Estimated profit rate; ③ Product status

    三. Shipping settings

    四. Billing method settings

    Click the guide to check.

    That’s all!

    Note: Your Etsy orders will now be automatically imported into POPCUSTOMS.

    POPCustoms Shipping Zone

    1 United States

    United States

    2 Canada

    Canada

    3 Mexico

    Mexico

    4 Europe

    United Kingdom, France, Germany, Italy, Spain

    5 Rest of Europe

    Austria, Belgium, Bulgaria, Croatia, Cyprus, Czech Republic, Denmark, Estonia, Finland, Greece, Hungary, Ireland, Latvia, Lithuania, Luxembourg, Malta, Netherlands, Norway, Poland, Portugal, Romania, Slovakia, Slovenia, Sweden, Switzerland

    6 Oceania

    Australia, New Zealand

    7 Middle East

    Bahrain, Israel, Saudi Arabia, United Arab Emirates

    8 JP

    Japan

    9 Asia

    India, Malaysia, Philippines, Singapore, South Korea, Thailand, Vietnam

    10 Rest of World

    Angola, Antarctica, Argentina, Azerbaijan, Bangladesh, Benin, Bhutan, Botswana, Brazil, Burkina Faso, Burundi, Christmas Island, Colombia, Djibouti, Gabon, Gibraltar, Guam, Guernsey, Guinea, Indonesia, Isle Of Man, Jersey, Kazakhstan, Kyrgyzstan, Ivory Coast, Pitcairn Islands, Russia, Rwanda, Saint Helena, Saint Pierre And Miquelon, Samoan Islands, San Marino, Senegal, Serbia, Seychelles, Sint Maarten, South Africa, South Georgia And The South Sandwich Islands, Svalbard Og Jan Mayen, Swaziland, Togo, Tunisia, Uganda, Ukraine

    11 CN

    Hong Kong, Taiwan, Macau

    Q: How to make my orders charged from my credit card automatically when they come to POPCUSTOMS?

    In order for your order to be automatically charged to the credit card you have added to our POPCUSTOMS and go directly into production after syncing in, you should set up the shipping matching correctly and add your credit card to our site. Please follow the steps below to set them up.

    1. Shipping settings

    Go to Dashboard -> Stores to find the store you connected to and click Settings to get started.

    Choose ‘Set multiple shipping methods‘ to set up the matching between the rate name you set in your store and the shipping methods provided by us so that your orders are assigned a proper shipping method automatically when they come to our site.

    For example, I provide Express, Standard, and Free shipping for my customers to choose from in my Shopify store.

    I have to set up the shipping matching to make sure my Standard and Free shipping orders will be assigned to the most cost-effective Standard shipping methods of POPCUSTOMS, and so do my Express orders. Hence the settings should be as below,

    2. Billing method settings

    Let’s move forward to complete the billing method settings to add your credit card. You can choose ‘Immediate automatic deduction‘ or ‘Automatic deduction by POPCUSTOMS x hours later‘ to make the automatic deduction happens.

    And then click ‘click here‘ to add your credit card information.

    After completing these settings, don’t forget to click the Confirm button.

    That’s all!

    Q: Can I integrate my Amazon store into POPCUSTOMS?

    Currently, we can’t integrate into Amazon stores, but you can export your design info including images and descriptions from our website, fill them in your Amazon product template, and import them to Amazon.

    Step 1: Create a custom store

    Step 2: Download Product Template from Amazon

    Step 3: Export designs from POPCUSTOMS

    Step 4: Fill in Amazon Product Template & Upload

    To sync products and place orders manually, create a custom store.

    Step 1: Create a custom store

    Click the Create button under Amazon to create an Amazon store, and name the store as needed. This store will be used when you import your Amazon orders.

    0016300a9e1cb0b5481133108b66411

    0016300a9dbc6160c167e77625f8a82

    Step 2: Download Product Template from Amazon

    Go to your Amazon seller central to generate and download the product template you need.

    Choose the marketplace of your Amazon store.

    This product template file should be saved for use later.

    Step 3: Export designs from POPCUSTOMS

    After completing your designs, you can go to Dashboard -> My Designs to find and select them, and click Bulk actions -> Download mockups to download product data.

    Step 4: Fill in Amazon Product Template & Upload

    Copy descriptions, images, and SKUs from the downloaded product data file at POPCUSTOMS and paste them to the product template downloaded from Amazon.

    *Since we use SKUs to match products when producing, we suggest you use our SKUs and don’t make any changes.

    Finally, upload the product template to Amazon

    That’s all!

    *Click here to learn how to import your Amazon orders to us for fulfillment.

    Q: How to have my branding items and ship them with my orders?

    Let’s show you how to add your branding items to your designs so that they can be shipped with your orders.

    *The branding items will not sync to your store as commodities so you should set your retail price of products higher enough to include the branding materials costs. However, the mock-ups of the branding items will be shown on your storefront if you use the Publish button to sync products.

    Step 1: Create your brand

    Step 2: Design and add branding materials

    Step 3: Add branding materials to products

    Please follow the steps below to make sure your branding materials will ship with your orders successfully.

    Step 1: Create your brand

    First of all, you have to create your brand. If you have different stores with different brands, you can create different brands to store your branding materials separately.

    00163468744811055571e0cf8fe6468

    Note: You can delete the brand if needed, but all branding materials under this brand will be deleted as well. You can move them to your other brands as needed before delete.

    001634687754144322c0f95f6d23118

    0016346877deac08c47cef2d1d8778f

    Step 2: Design and add branding materials

    Click Templates, and pick one to design.

    001634687b0c4f1c930a13b8d145b8d

    Save the design and store it under your brand. If you have created a new brand before designing, you can choose the brand name directly here. If not, you can click Add to create one by now.

    001634687d275c7c4738984f385a61d

    Then you’ll see your designed branding materials are under your brand.

    001634687fb2892aca5968bb965b333

    Step 3: Add branding materials to products

    Different branding materials can be added to different products, for example, custom shoe boxes can be only added to Footwear.

    There are some circumstances in which you can add your branding items and make sure they will be shipped with your orders.

    一. For orders automatically synced from stores

    ① Go to Stores, find the store you connected and click the content under Synced designs to find products that you want to add your branding materials.

    Click + to add the branding materials that you want to ship with this product.

    001634688b27bc31e8351817a5ab815

    001634688ae85591e636ce46c41ee57

    That’s it! After that, all orders for this product synced from this store will be automatically fulfilled and shipped with the added branding materials.

    *If you forget to add the branding materials first and the order has been synced to POPCUSTOMS. You can go to Orders->On hold to find this order and add the branding materials there.

    二. For orders placed from a shopping cart

    ② Pick the product that you want to purchase to design, go to My Designs and add it to the shopping cart.

    001634688f067c50f1ea1f463e95219

    001634688f0512ff73a177756d0ce86

    001634688eb58c37036a14297d4eec6

    Here you can add the branding materials that you want to ship with your order.

    0016346891b2617e616672f997b730d

    Then click the Place Order button to submit and pay.

    00163468919c55fa7c908b38d849a92

    *Please noted that the number of branding items will be the same as the number of products.


    That’s all.

    Q: How to create a shipping profile for POPCUSTOMS products on Etsy?

    You can set up calculated shipping on Etsy only when you ship from the US or Canada. However, POPCUSTOMS ships items from China. Under this condition, the calculated shipping settings do not work for our products.

    If you choose POPCUSTOMS as one of your suppliers, we suggest you create an exclusive shipping profile for our products. Here is the guide below,

    Step 1: Create shipping profile

    Step 2: Fill in shipping details

    Step 3: Name the profile and save

    Step 1: Create shipping profile

    Log in to your Etsy account, go to the Shop Manager -> Settings -> Shipping settings -> Create profile.

    Step 2: Fill in shipping details

    Fill in the requested shipping information, for example,

    1- Country of origin: China

    2- Original postal code: 362200

    3- Processing time: You can find the production time for each product on popcustoms.com

    4- Standard shipping: You can provide different Standard shipping options to different destination countries. You can set “Free Shipping” or “$xx for the first item” and “$xx for the additional items”. You can download our shipping fees for reference here https://popcustoms.com/shipping

    5- Everywhere else: If you do not find the corresponding shipping services in the options, you can choose Other and enter the delivery time and shipping fees manually.

    6- Add a shipping upgrade: You can also add options for shipping upgrades so that the buyers can choose a faster shipping method.

    Step 3: Name the profile and save

    Name this profile properly so you can distinguish it from your other shipping files created for your other suppliers. Save it to use, that’s all.

    You can find all the shipping profiles you created here, you can edit or duplicate them if needed.

    Q: WooCommerce troubleshooting for 403 / 404 / 500/ 503 / 504 / 524 / thumbnail errors

    一. 403 / 404 Errors

    When you try to sync designs to your store but failed, the failure reason is shown below in the page “Store” -> “Synced designs”:

    “HTTP request returned status code 403”

    It occurs because your hosting provider prevents popcustoms.com from making requests to your store. To solve this problem, you should add our IP address 47.89.194.2 to the IP whitelist of Mod_Security or other security software. If you don’t know where to find the IP whitelist, please contact your hosting provider to ask for help.

    for cloudflare users, you can follow the picture below.

    Once IP added to whitelist, please click “Retry”. If the error still persists, please read on and contact us with the info mentioned below.

    二. 500 / 503 / 504 / 524 Errors

    If you sync designs to your WooCommerce store but fail, there comes up an error and state “There Has Been a Critical Error on Your Website” or other 5xx errors.

    To solve this problem, please go to your WordPress Dashboard>WooCommerce>Status>System status>Get system report>Copy for support to copy the information and provide it to us.

    And then go to WooCommerce>Status>Logs to view and find the latest fatal-errors-2023-xx-xx log, copy and provide it to us.

    Contact us at service@popcustoms.com to provide the information mentioned above, our IT support team, POP & WooCommerce project team members will help solve these problems asap.

    三. Class-wp-image-editor/ Fatal Error

    When this type of error comes out, it means there’s an error in generating product thumbnails. Because of the execution time limit of your system, the product thumbnails can not be generated within the time limit. Under this condition, there are three solutions,

    Solution 1: Disable some thumbnail sizes with this plugin https://wordpress.org/plugins/disable-generate-thumbnails/ it will help speed up the generation.

    Solution 2: Extend the execution time limit of your system. Try this plugin https://wordpress.org/plugins/wp-maximum-upload-file-size/ and it may help extend the time limit to 600 seconds.

    Solution 3: Use Publish feature instead of Sync feature to sync products to your WooCommerce store so that you can just select 2-3 mockups to save the generation time.

    四. “Out of Stock” & No Variations Error

    This error happens because we provide too many mock-up pictures, WooCommerce can’t handle all of them. Under this condition, please follow the steps below to solve it.

    ① Head to the Dashboard -> Stores at POPCUSTOMS to find your connected WooCommerce store, click the Synced designs to find the product that failed to show correctly in your storefront, and delete it.

    ② Log into your WooCommerce to delete this product from your store as well, please go to the Trash to permanently delete it.

    ③ Go to POPCUSTOMS to publish this product to your WooCommerce store again, please don’t forget to delete some mock-ups in the final step so that the sync can be successful. Use the Publish button instead of Sync to stores button to sync products, and we don’t suggest you sync them in bulk.

    To avoid this issue, please kindly always use our Publish button to sync products to your WooCommerce store. At the same time, we suggest you only choose 3 or fewer mock-ups in the final steps during publishing.

    Thanks.