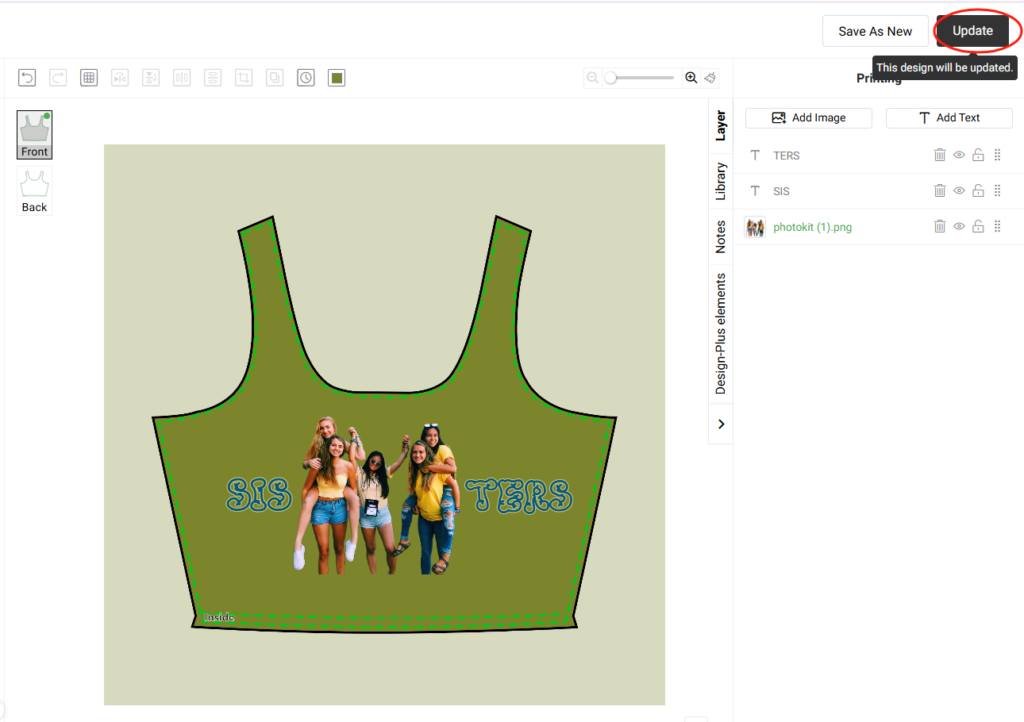
Use our Edit design feature to update your design in a second at POPCUSTOMS. If the product has synced to your store, make sure that the design has been updated as well in your store.
There are two steps to make it happen,
Step 1: Edit design at POPCUSTOMS
Step 2: Update product design in your store
Following the steps below,
Step 1: Edit design at POPCUSTOMS
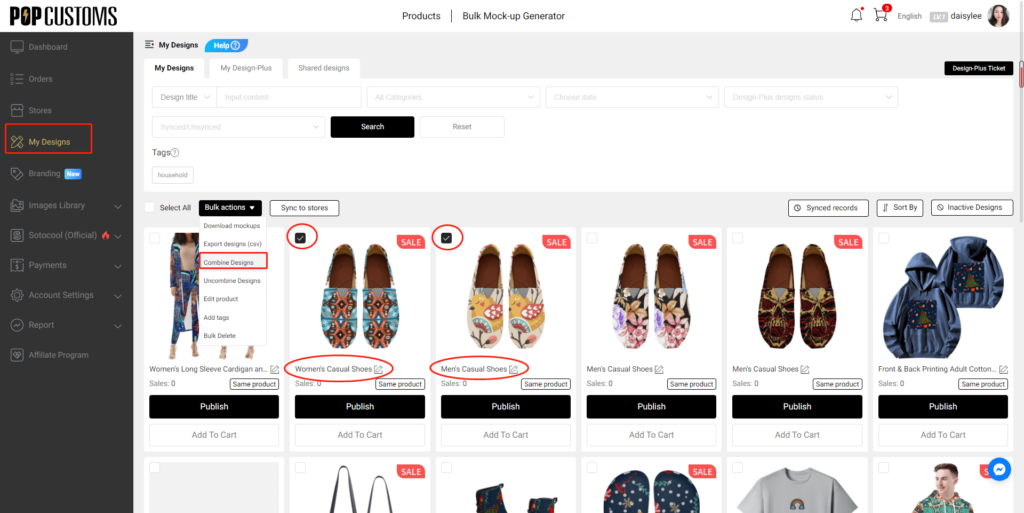
Go to Dashboard – My Designs to find the design, and click the Edit design icon to edit it as needed.
After editing, please click the Update button to update this design successfully.
Step 2: Update product design in your store
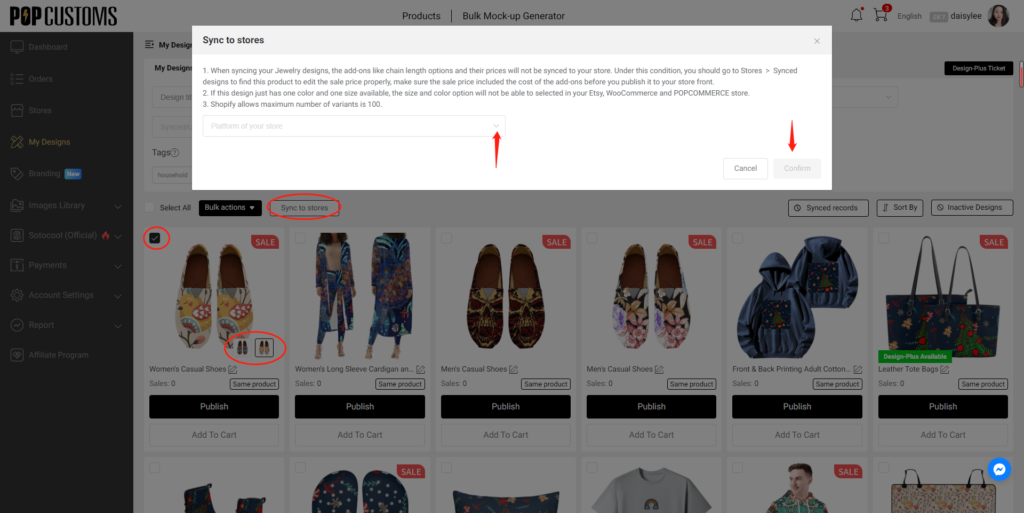
If this design has been synced to your store, the store will be listed and shown up in a pop-up window.
Click the store link in the pop-up to update this design in your store directly so your customers will see and choose the correct design when they purchase in your store.
Click Edit, and scroll down to find the Mockups. Uncheck the old mockups with the previous design, and then check the updated mockups. Finally, click Confirm to update them in your store successfully.
Finally, go to your store to find this product’s listing and check whether the mockups are updated successfully or not.
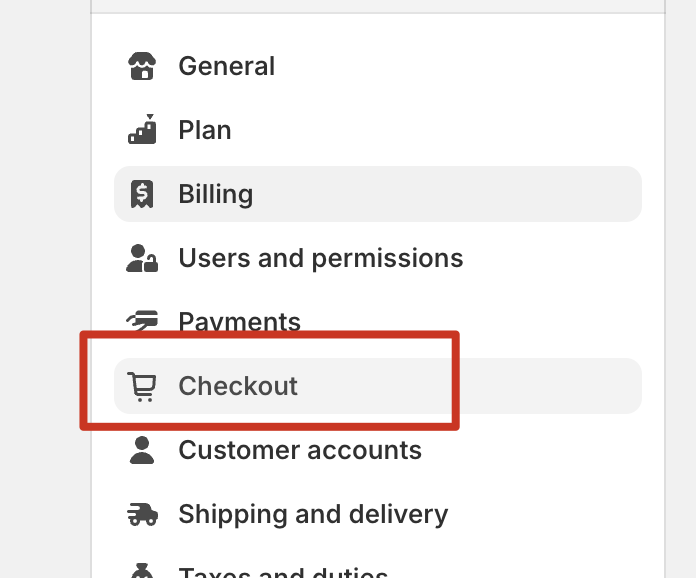
Please go to your Shopify store admin page, click Checkout, and scroll down to find the Shipping address and phone number, choose Required. Save the change, that’s all.
1. You should have one Shopify store to get started.
2. A platform can only authorize one store. If you want to authorize a new store on the same platform, you need to delete the previously authorized store.
Step 1: Sign up for a free account on POPCUSTOMS
Sign up for a free account by using your Email address or social media accounts.
Step 6: Confirm the connection to complete the authorization.
Step 7: Add your products
To accept orders and make money you need to publish products to your Shopify store. On POPCUTOMS, you can just click Products on the Dashboard page to design and add products conveniently.
Step 8: Complete the Store settings after connection, including
1. Basic settings
2. Sync settings: ① Currency; ② Estimated profit rate; ③ Product status
We previously provide only black and white shoelace options, now we allow sellers to add different color shoelace options for shoes under one listing.
Follow the steps below to know how to make it happen!
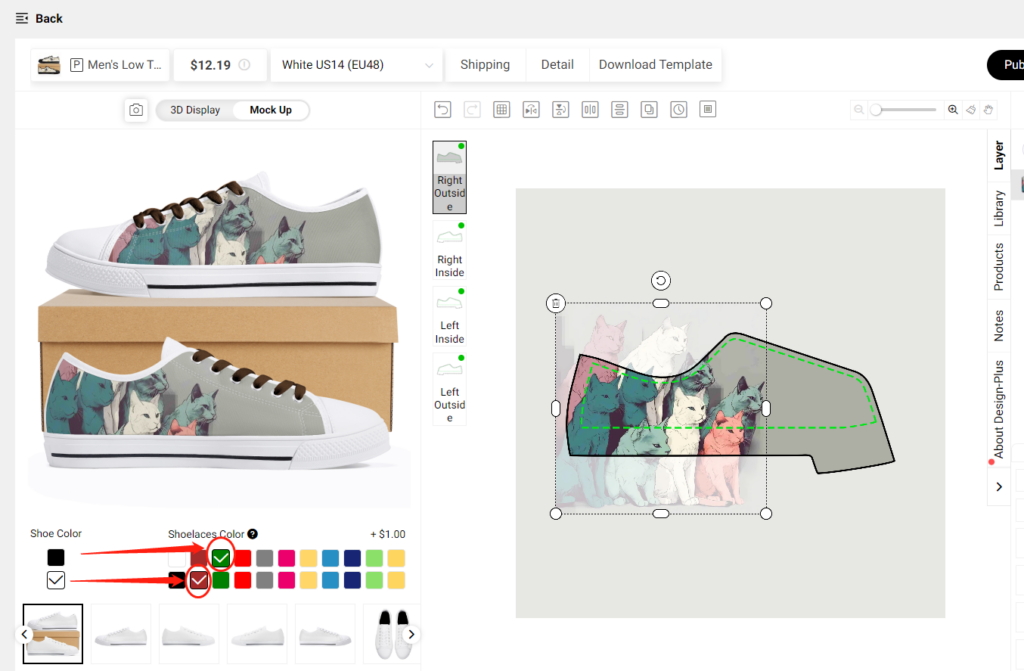
Step 1: Choose a shoelace color
You are allowed to choose different shoelace colors for different colors of soles. For example, I choose a green shoelace for black outsole shoes and choose a red shoelace for white outsole shoes.
Click Save then you’ll see the mockup with the different color shoelaces.
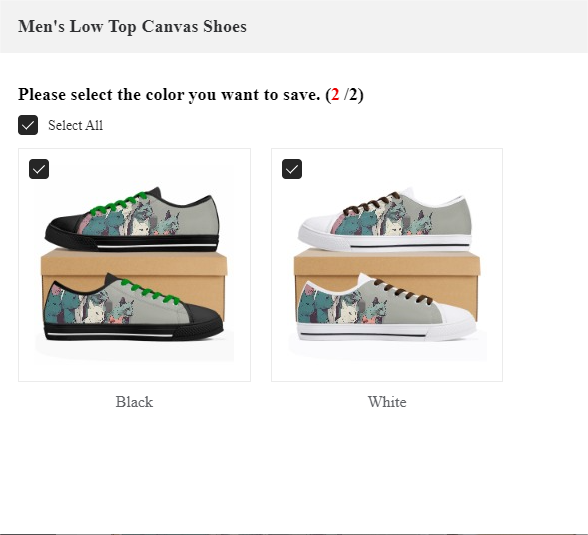
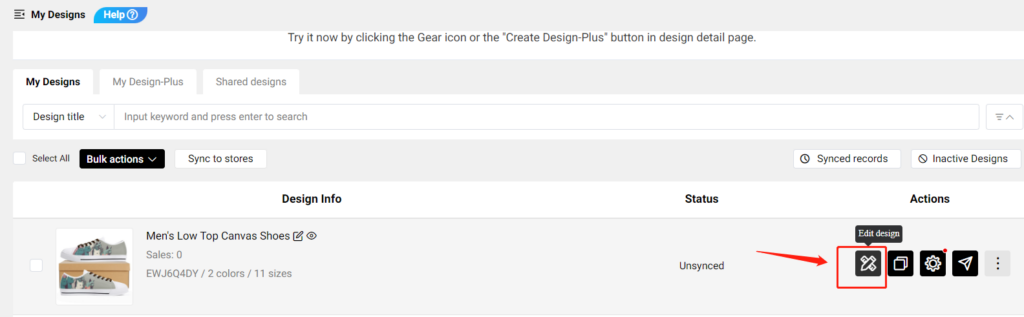
Go to My Designs to find the shoes that you saved, and click Editdesign to edit the color of the shoelace.
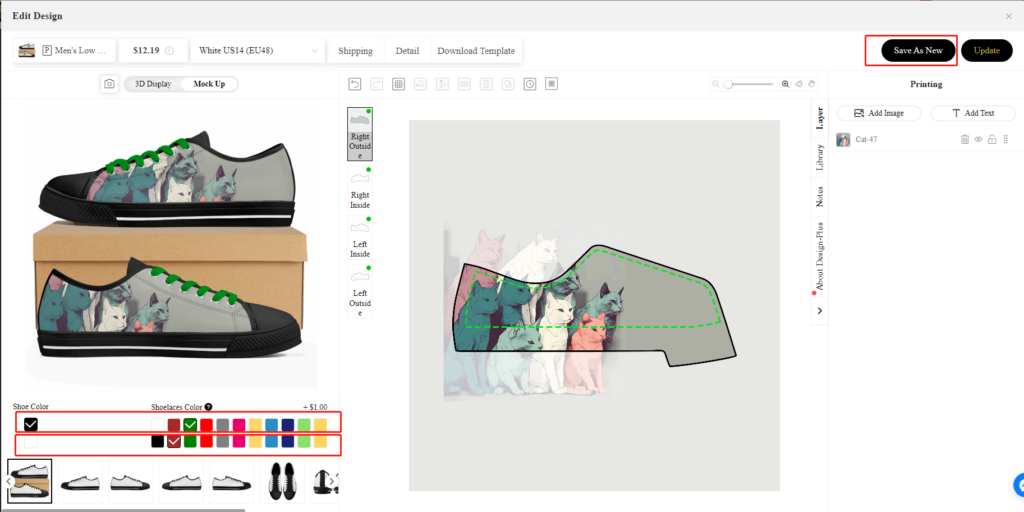
Change the color of the shoelace and click Save As New. In this way, you can create many shoes with different shoelace colors quickly and conveniently.
Step 2: Publish to your store
Combine all these shoes with different colored laces and publish them to your store, set the product’s status as Draft first so you can change the value of the variants as needed.
Click here to learn how to combine products and how to modify the color value options of your shoes.
*Note: If you have 50,000 or more variants/skus in your store, you’re subject to Shopify daily rate limit: 1,000 variants/skus per day. If you’re on the Shopify Plus plan, then the limit doesn’t apply to you. For a product, you can create up to 100 variants/skus. Click here to learn more. Please contact Shopify for more info or ask for help with the variant’s limitation.
*Your customer receives the shoes with the lace color they chose.
It’s essential to note that POPCUSTOMS currently offers a shipping rate of $0.00 for products shipped to the United States, which means the prices displayed on the website include free shipping for that region. You can also configure shipping rates for other countries and regions based on POPCUSTOMS’ shipping policies.
And pls kindly note that if shipping rates are not set up, there may be display issues with out of stock/sold out after product synchronization.
Here’s a guide to help you set up shipping rates for POPCUSTOMS products in your Shopify store.
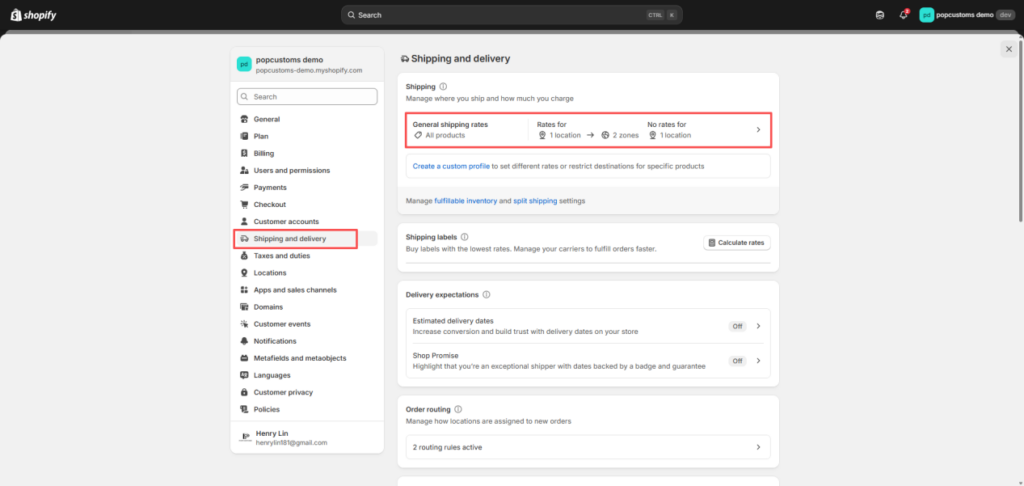
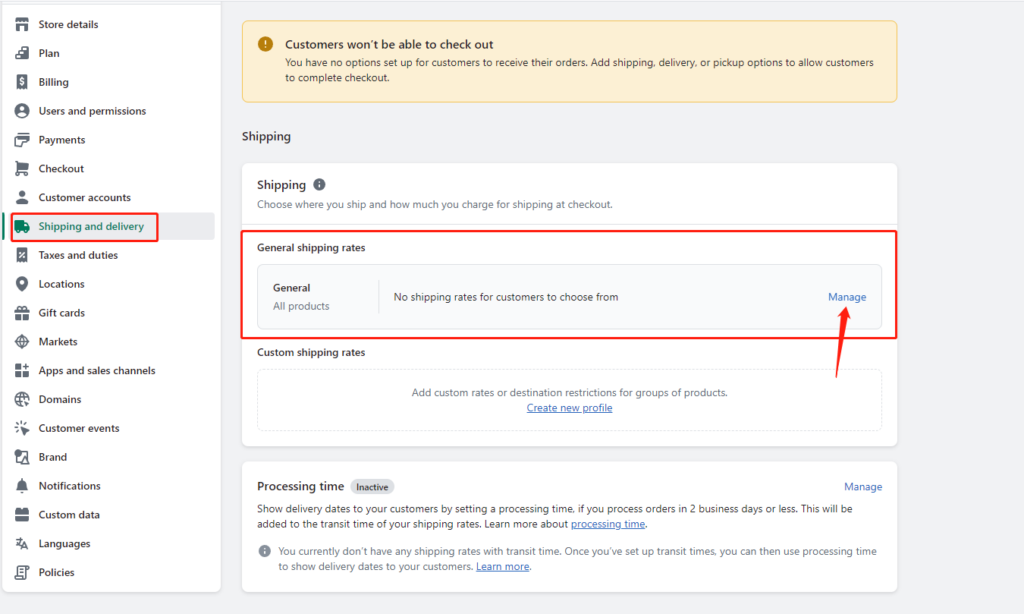
Step 1: Access Shipping Settings
Go to your Shopify admin page. From the left-hand menu, click on the Settings option.
Then, click on Shipping and Delivery.
Shipping and delivery – General – Manage
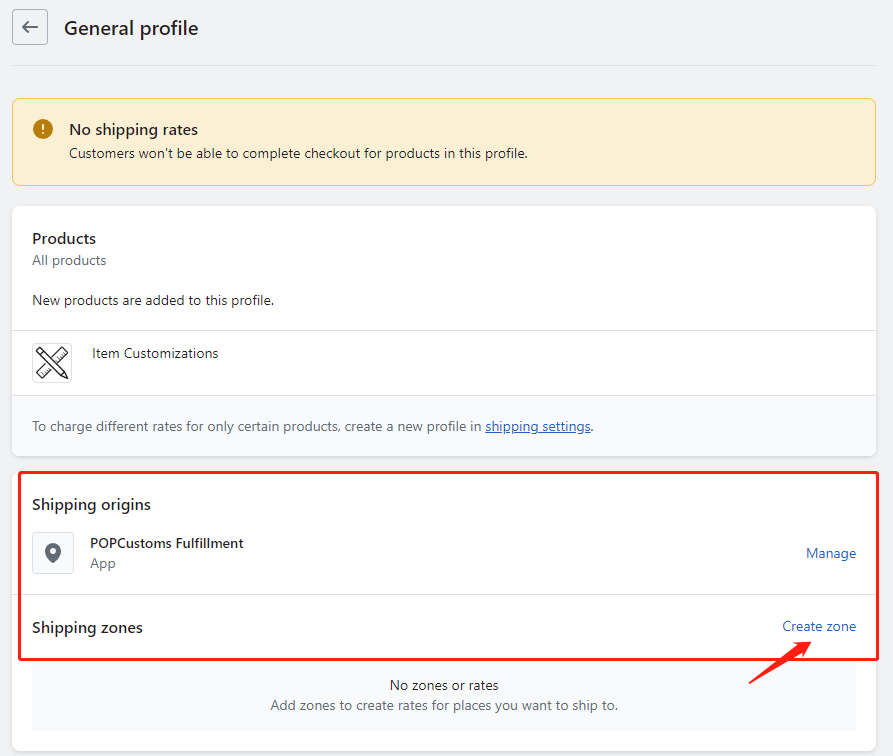
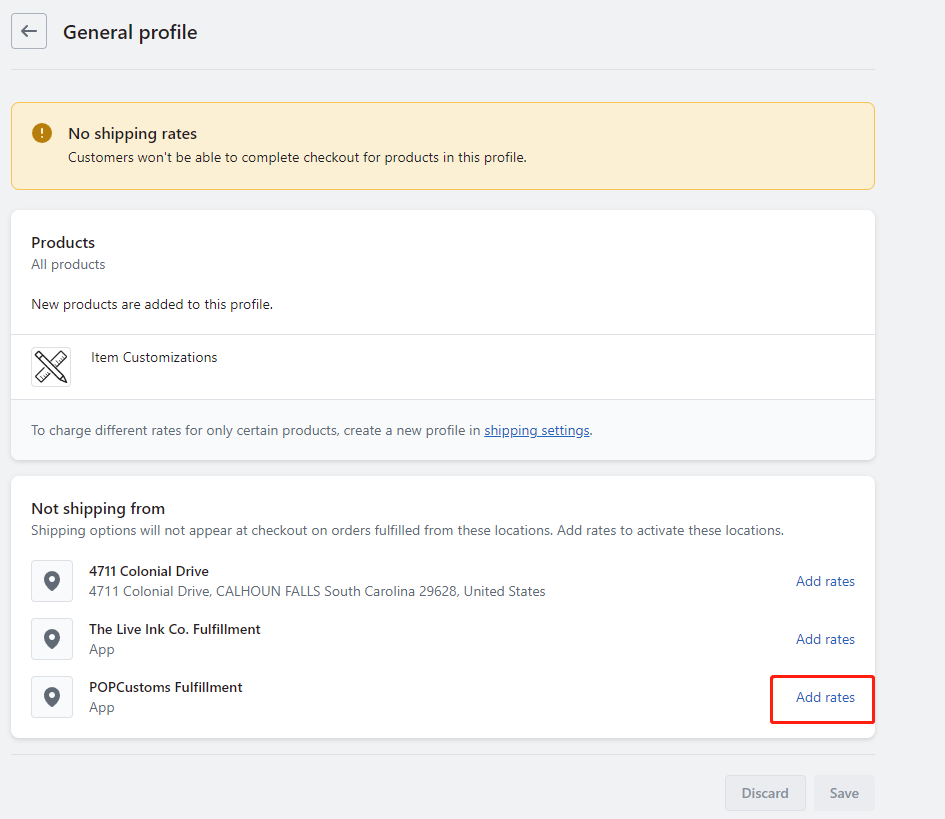
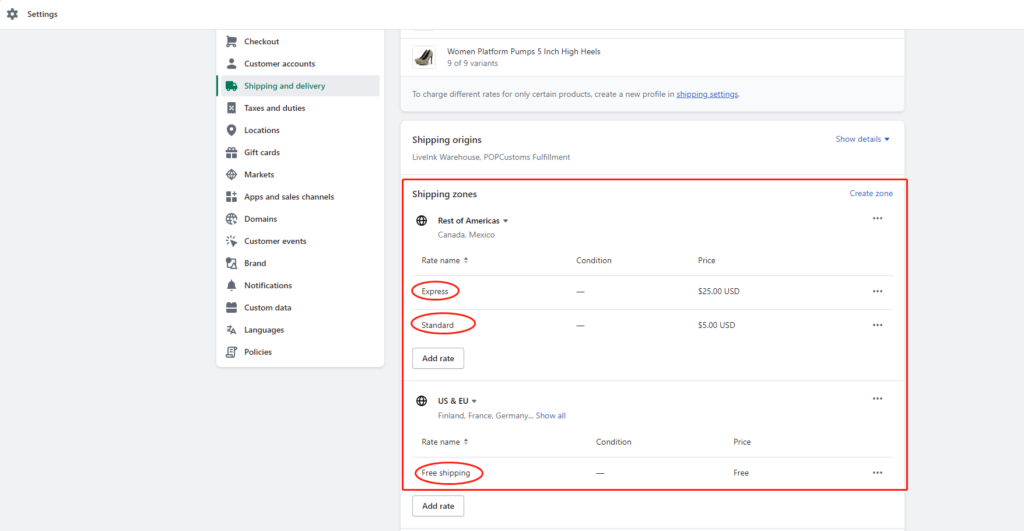
Step 2: Create or Edit Shipping Zones
In the Shipping and Delivery page, locate the Shipping Zones section.
If you already have shipping zones created, select the one you wish to edit. If not, click the Create Shipping Zone button.
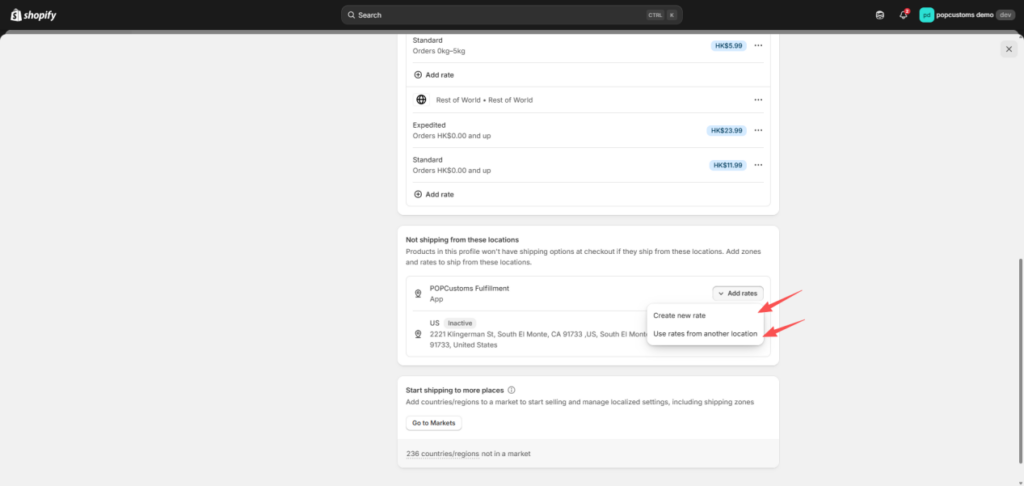
Step 3: Set Up Shipping Rates
In the shipping zone area, look for the option to Add Rate.
Click on the Add Rate button.
Example Setup:
United States:
Name: Free Shipping to the U.S.
Rate: $0.00 (since POPCUSTOMS offers free shipping to the U.S.)
Mexico:
Name: Shipping to Canada
Rate: $3.00 (set according to POPCUSTOMS’ policy)
European Union:
Name: Shipping to EU
Rate: $0.00 (set according to POPCUSTOMS’ policy)
Other Regions:
Name: Shipping to Other Countries/Regions
Rate: $9.99 (set according to POPCUSTOMS’ policy)
Download POPCUSTOMS’ product shipping rates to help you set up better shipping rates!
Step 4: Save Changes
After confirming all your shipping rate settings, don’t forget to click the Save button in the upper right corner to save your changes.
Step 5: Test Shipping Calculation
Once you’ve completed the setup, it’s a good idea to conduct a test:
Simulate a purchase in your Shopify store.
Add a POPCUSTOMS product to your cart and proceed to the checkout page.
Double-check that the shipping rates display correctly based on the selected region.
Step 6: Sync with POPCUSTOMS
Make sure you sync your product information and shipping rates with POPCUSTOMS to avoid any discrepancies:
Log in to your POPCUSTOMS account.
Ensure that your shipping-related settings are updated in your Shopify product sync records.
POPCUSTOMS Shipping Zone Information
For more details about POPCUSTOMS shipping zones, please visit this link: POPCUSTOMS Shipping Zone.
Please feel free to contact us at business@popcustoms.com if you need any assistance.
Generally, when you publish our products to your Shopify store, the color values will be the base color of the product template rather than the color of your designs.
If you combine different designs of the same product and want to change the color options of the products shown on your storefront, please follow the steps below.
Publish combined products to your store first but set it Inactive. Since Shopify allows sellers to create up to 100 variants for a product, we suggest you check the variants of products before you combine and publish them. For shoes, we suggest you combine at most 4 of them.
Learn more about the variants’ limitations on Shopify here.
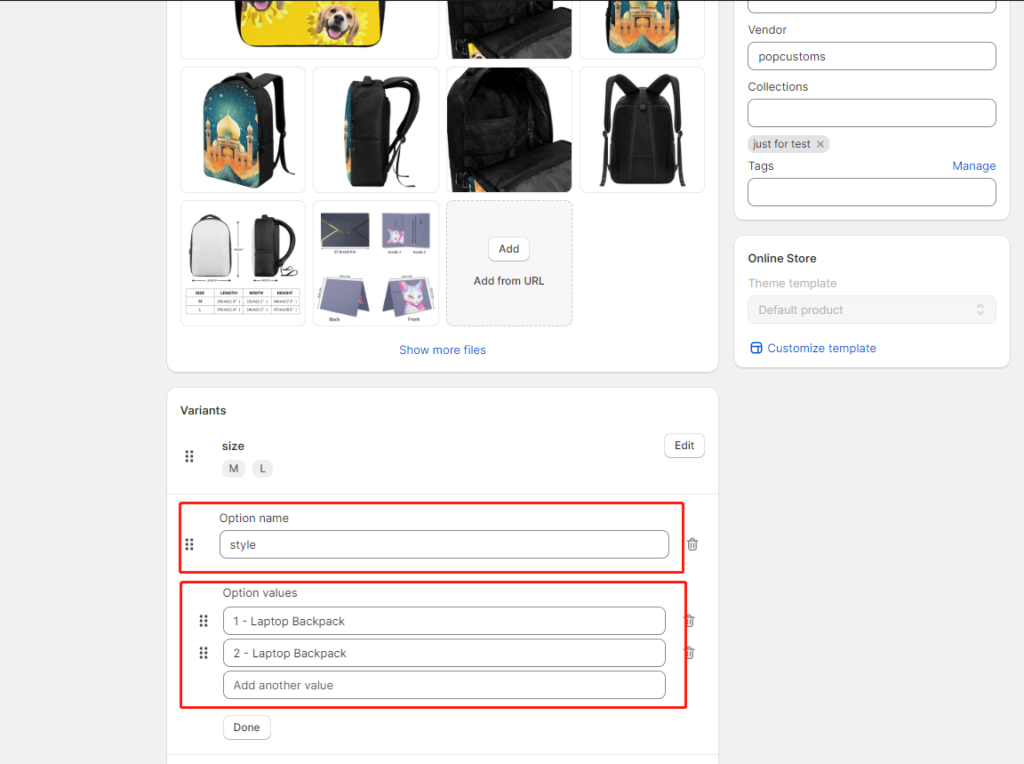
Step 2: Modification color value on Shopify
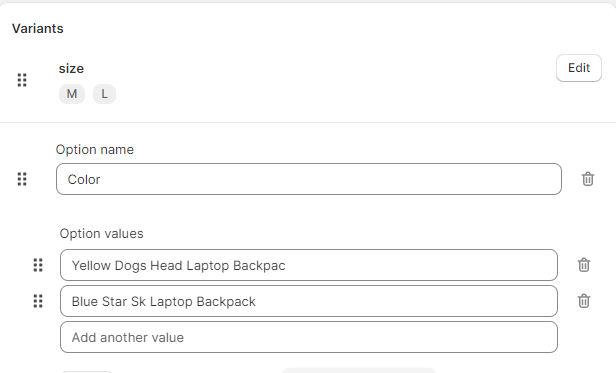
Log in to your Shopify admin, click Products to find the combined product, and click it to modify the Option name and Option values of the product.
For example, I change those two values mentioned above as below,
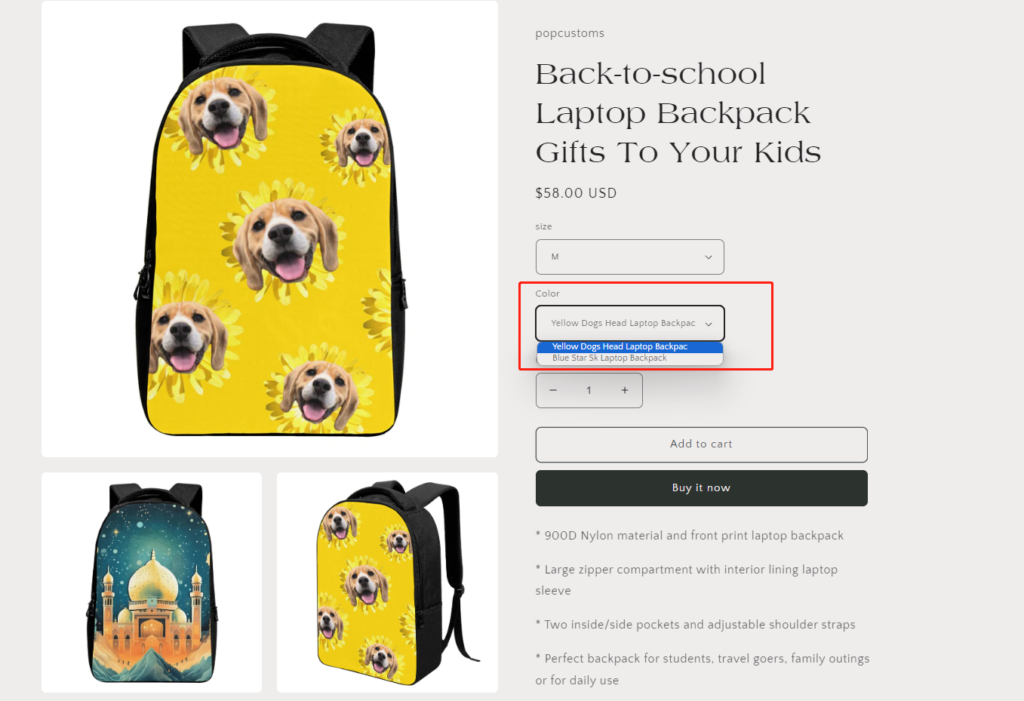
And then save the changes, set the product’s status to Active. That’s what it looks like on your storefront.
If you have an order placed from your Shopify store, but this order didn’t sync to our site successfully, please follow the steps below to solve this problem.
Step 1: Change order status settings
Step 2: Export orders
Step 3: Import orders
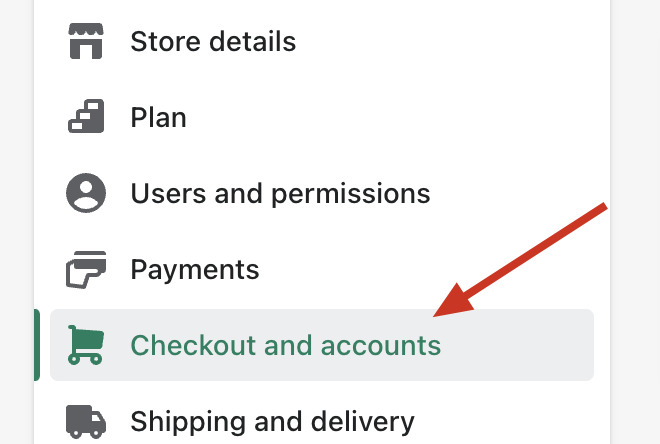
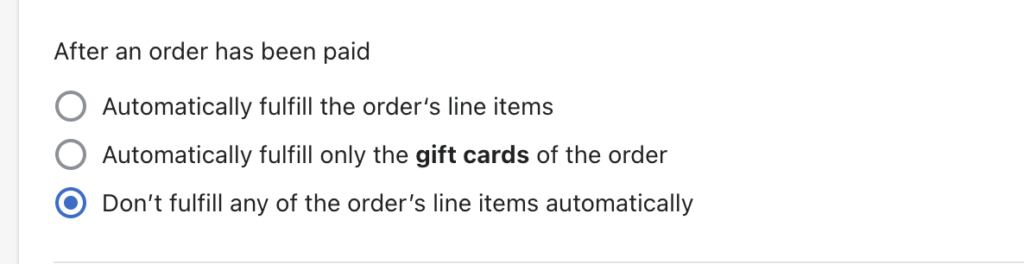
Step 1: Change order status settings
Log in to your Shopify admin account, go to Settings -> Checkout and accounts, and change the status after an order has been paid to “Don’t fulfill any of the order’s line items automatically“. Then your future orders can automatically sync to our site to fulfilled successfully.
*Noted: If you have installed Printful App to use simultaneously, you should change the setting to “Automatically fulfill the order’s line items” instead.
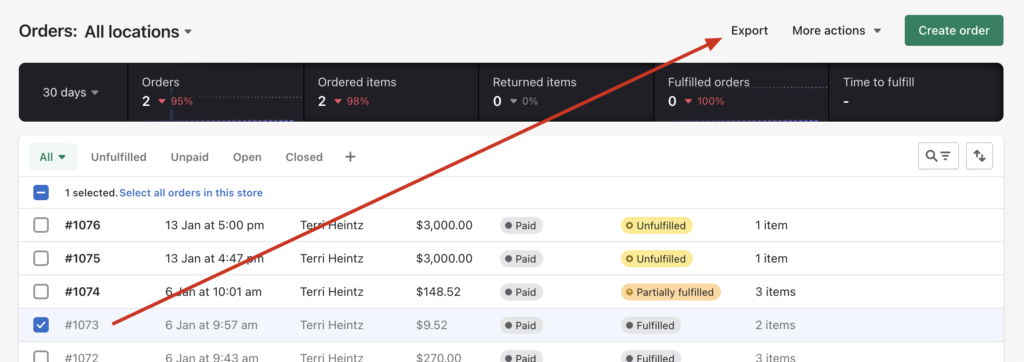
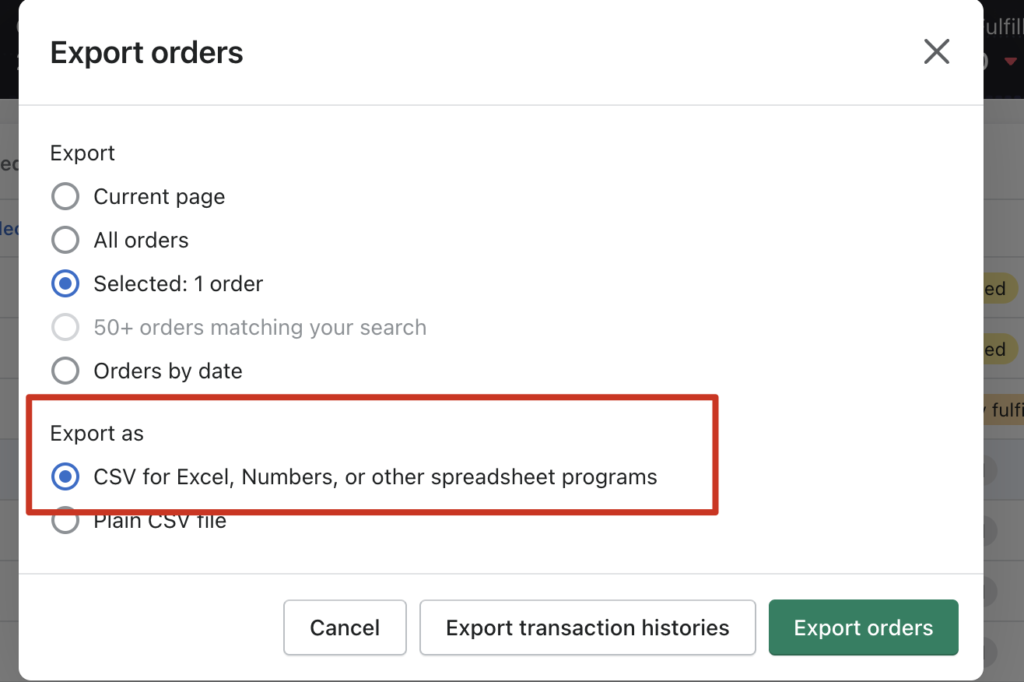
Step 2: Export orders
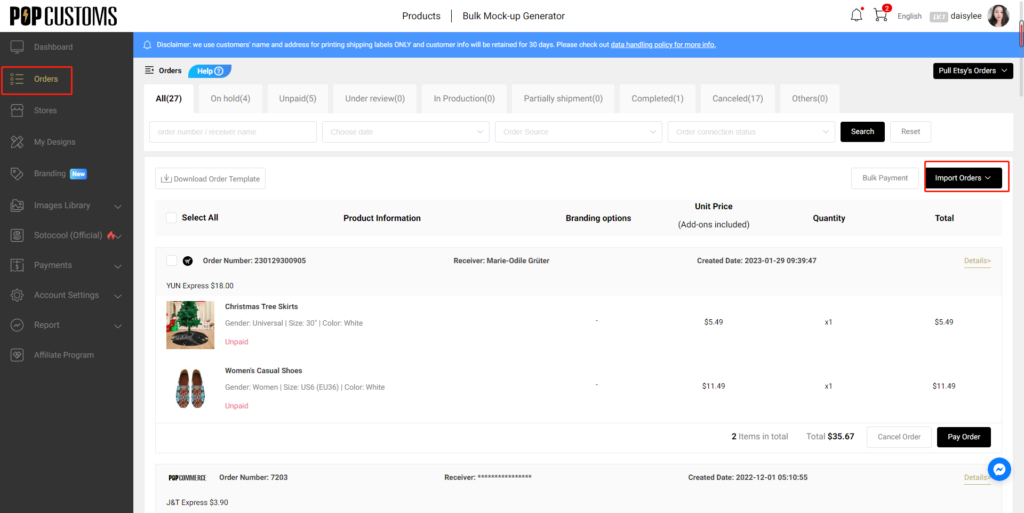
Regarding the order that has failed to sync, you need to export it and import it to our site manually so we can fulfill and ship it to your customers.
Step 3:Import orders
After exporting your order from your store, please go to our site to import it.
After you import it to our site, we can successfully fulfill and ship this order to your customers!
One important thing to know:
If you have an order which includes both POPCUSTOMS and Printful items, Shopify sync items to your different suppliers to fulfill and ship. When we all ship the items and update the tracking numbers to your store, the earlier tracking number will be overwritten by the later one because one order on Shopify can only has one tracking number, please kindly noted.
In order for your order to be automatically charged to the credit card you have added to our POPCUSTOMS and go directly into production after syncing in, you should set up the shipping matching correctly and add your credit card to our site. Please follow the steps below to set them up.
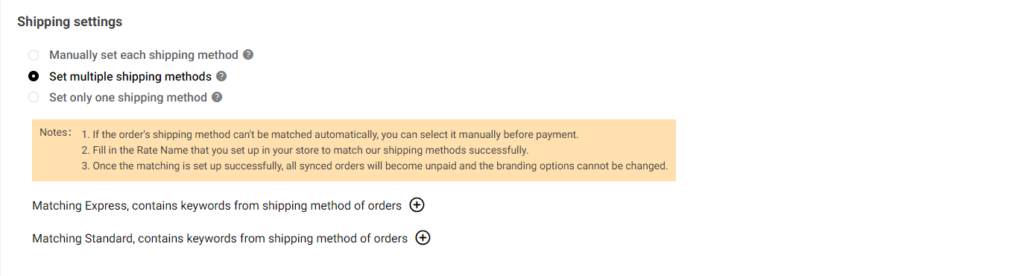
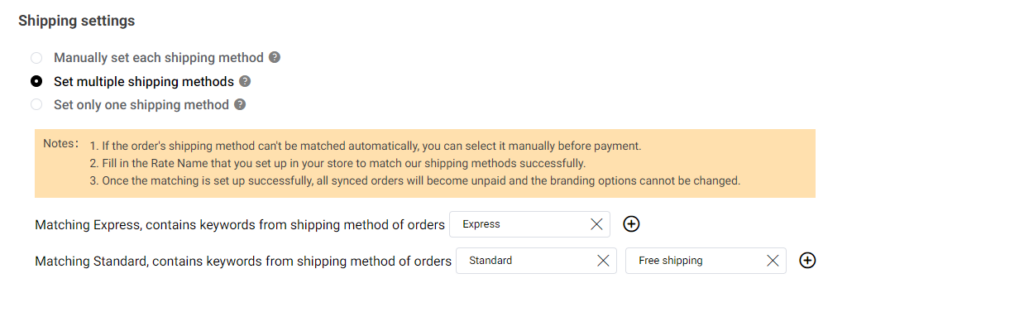
1.Shipping settings
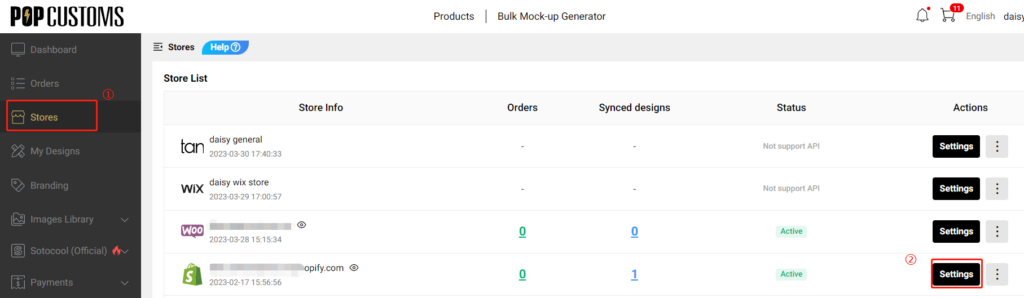
Go to Dashboard -> Stores to find the store you connected to and click Settings to get started.
Choose ‘Set multiple shipping methods‘ to set up the matching between the rate name you set in your store and the shipping methods provided by us so that your orders are assigned a proper shipping method automatically when they come to our site.
For example, I provide Express, Standard, and Free shipping for my customers to choose from in my Shopify store.
I have to set up the shipping matching to make sure my Standard and Free shipping orders will be assigned to the most cost-effective Standard shipping methods of POPCUSTOMS, and so do my Express orders. Hence the settings should be as below,
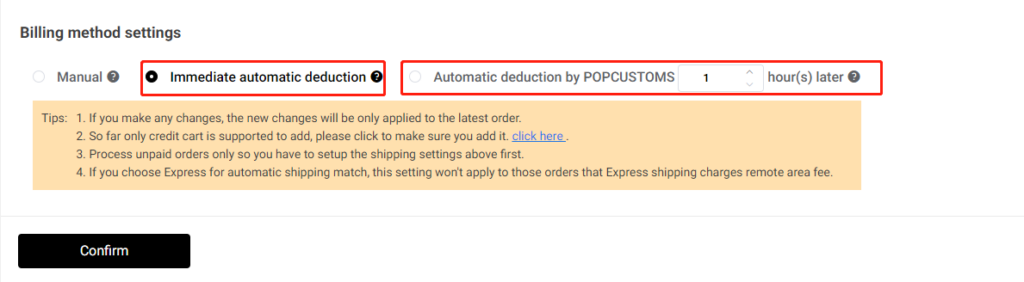
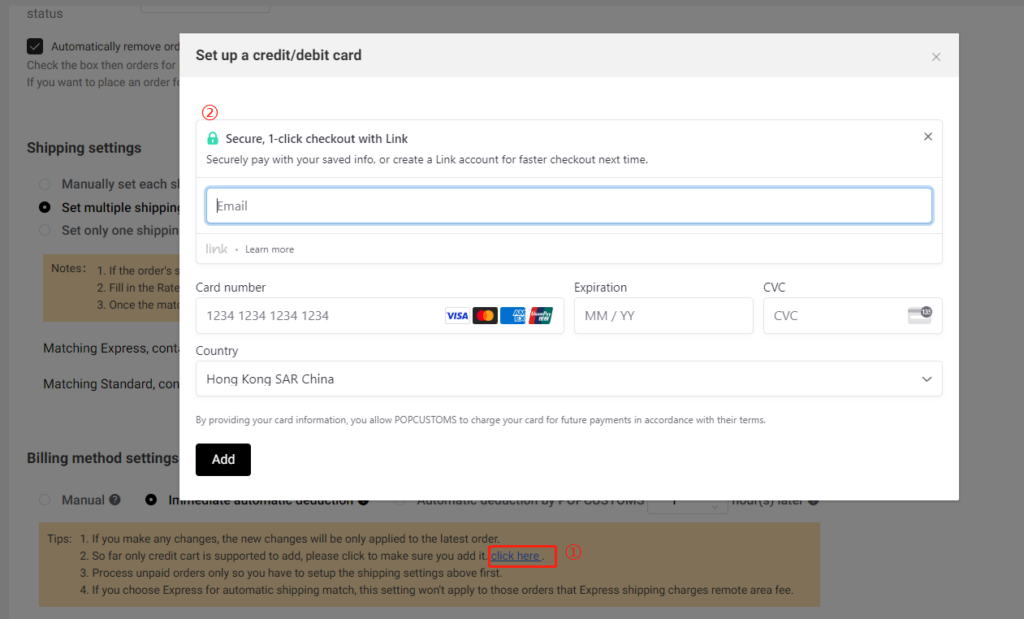
2. Billing method settings
Let’s move forward to complete the billing method settings to add your credit card. You can choose ‘Immediate automatic deduction‘ or ‘Automatic deduction by POPCUSTOMS x hours later‘ to make the automatic deduction happens.
And then click ‘click here‘ to add your credit card information.
After completing these settings, don’t forget to click the Confirm button.