Category Archives: BigCommerce

Q: How to update the design after the product is synced to the store?

Use our Edit design feature to update your design in a second at POPCUSTOMS. If the product has synced to your store, make sure that the design has been updated as well in your store.

There are two steps to make it happen,

Step 1: Edit design at POPCUSTOMS

Step 2: Update product design in your store

Following the steps below,

Step 1: Edit design at POPCUSTOMS

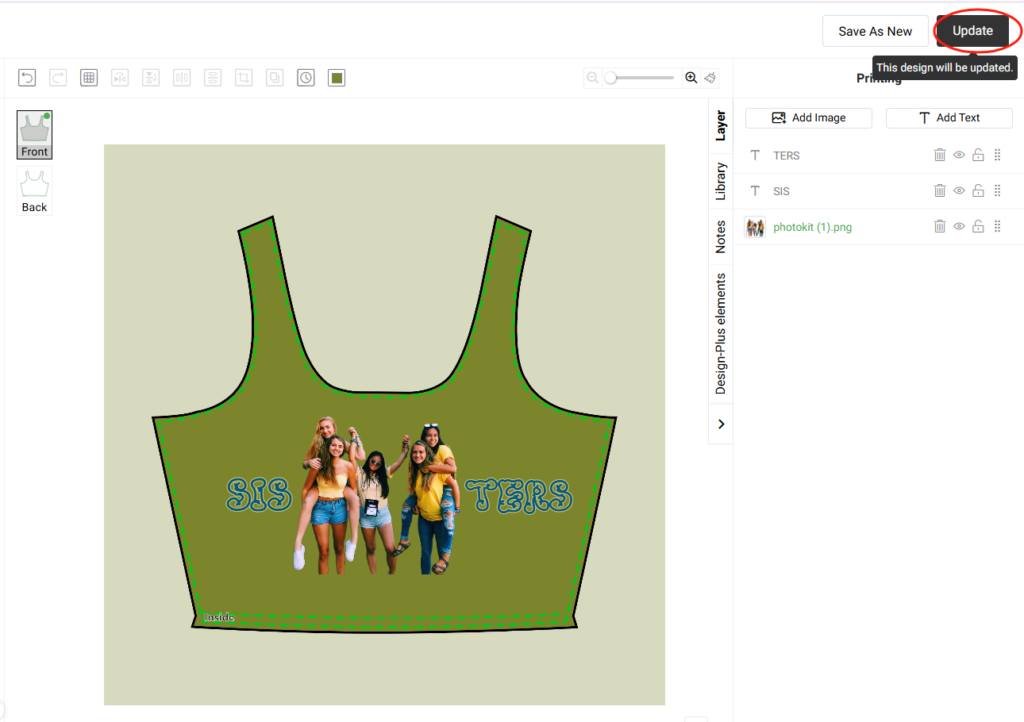
Go to Dashboard – My Designs to find the design, and click the Edit design icon to edit it as needed.

After editing, please click the Update button to update this design successfully.

Step 2: Update product design in your store

If this design has been synced to your store, the store will be listed and shown up in a pop-up window.

Click the store link in the pop-up to update this design in your store directly so your customers will see and choose the correct design when they purchase in your store.

Click Edit, and scroll down to find the Mockups. Uncheck the old mockups with the previous design, and then check the updated mockups. Finally, click Confirm to update them in your store successfully.

Finally, go to your store to find this product’s listing and check whether the mockups are updated successfully or not.

That’s it!

Q: How to make my orders charged from my credit card automatically when they come to POPCUSTOMS?

In order for your order to be automatically charged to the credit card you have added to our POPCUSTOMS and go directly into production after syncing in, you should set up the shipping matching correctly and add your credit card to our site. Please follow the steps below to set them up.

1. Shipping settings

Go to Dashboard -> Stores to find the store you connected to and click Settings to get started.

Choose ‘Set multiple shipping methods‘ to set up the matching between the rate name you set in your store and the shipping methods provided by us so that your orders are assigned a proper shipping method automatically when they come to our site.

For example, I provide Express, Standard, and Free shipping for my customers to choose from in my Shopify store.

I have to set up the shipping matching to make sure my Standard and Free shipping orders will be assigned to the most cost-effective Standard shipping methods of POPCUSTOMS, and so do my Express orders. Hence the settings should be as below,

2. Billing method settings

Let’s move forward to complete the billing method settings to add your credit card. You can choose ‘Immediate automatic deduction‘ or ‘Automatic deduction by POPCUSTOMS x hours later‘ to make the automatic deduction happens.

And then click ‘click here‘ to add your credit card information.

After completing these settings, don’t forget to click the Confirm button.

That’s all!

Q: How to transfer your existing orders for products designed at other suppliers to POPCUSTOMS for production?

Are you looking for a new Print-on Demand supplier to fulfill your existing business, because:

  • You want a better margin?
  • You want a better fulfillment service to better match your business development?
  • You want more shipping options?
  • You want to reduce the number of pod platforms (for easier management) but still be able to provide a wide range of products?
  • You are troubled by the fact that the original platform out of stock?

Take a moment to get to know us, we can be your loyal and awesome partner!

Transfer order to be fulfilled by POPCUSTOMS,

  1. It is free, easy and fast to transfer when you get your order.
  2. You don’t need to change store’s listings, which is a huge help for products that already have top-ranking and reviews.
  3. When your sales reach a certain amount, you will get $50-$300 coupon for branding your existing orders.
  4. Free photography service for the first 10 orders.

Let’s take Etsy order as an example to record a video tutorial to show you how to make it step by step.

Firstly, please make sure you have connected your store with POPCUSTOMS.
If you have problems with the connection, please refer to our Integration Tutorial

STEP 1 – Click “go to dashboard” to open “Stores” page , click “settings” of the store, remove the tick – “Automatically remove orders which designs not created on POPCUSTOMS”, and click “Confirm” to save change. https://popcustoms.com/stores/

STEP 2 – Click “Orders” to Open “On hold” page, find the order needs to be connected.

STEP 3 – Click “Connect this design” – “Products” – search for the corresponding product, select attributes customer ordered and click “Connect and design”. Then, upload your images to design the product, click “Connect and design” on the top right to save. If you have already created this design before on POPCUSTOMS, please click “My designs” to select it.

△NOTE ①: The attributes cannot be changed after you designed, so please make sure you select the correct one before click “Connect and design”.

△NOTE ②: About “If you check the box, all orders of designs with the same SKU will also be automatically connected.” Let’s take an example to understand this rule: You receive an order with “14 inch School Backpack”, you created the design on POPCUSTOMS and it is assigned to an exclusive POPCUSTOMS SKU “7W0QQK2W-1”. Next time, if you receive another order with “14 inch School Backpack”, we will automatically connect this order with your finished design, so you will see it on “On hold” page, you just need to submit and pay.

STEP 4 – Check the product attributes again and click “Confirm connection” to select shipping method and pay the order.

That’s all. Interested in learning more? Contact us now!

Q: How to place a warehouse order and store it in POPCUSTOMS warehouse?

Store your products and branding options in our warehouse to save fulfillment time for your drop shipping orders in peak season.

一. Create Warehouse Order

Head to Dashboard -> Warehouse -> Warehouse Orders -> Create Warehouse Order to place your warehouse order.

二. Choose Designs & Add to Warehouse Shopping Cart

Add your designs, branding options, or Sotocool designs to the warehouse shopping cart.

三. Place Warehouse Order

Click the Confirm button, you’ll be driven to the shopping cart details page. You can increase or decrease the quantity of the designs that you selected, delete, or add designs to the shopping cart.

Once you confirm everything, you can place your warehouse order.

Click here to place your first warehouse order now!

Something important to know:

① Since we can’t know the quantity and the types of your warehouse order, we can’t give an estimated fulfillment time for your reference. However, you’ll get an email once we complete it.

② When you place a regular order and the items in this order are stored in our warehouse, we’ll ship the items from your inventory and deduct the cost of the items from the current payment.

BigCommerce Store Integration Tutorial


Note:

1. Please follow all the steps below to authorize.

2. A platform can only authorize one store. If you want to authorize a new store on the same platform, you need to delete the previously authorized store.


Step 1: Sign up for a free account on POPCUSTOMS

Click the Sign up button in the right upper corner to create a free account on POPCUSTOMS.

Step 2: Install the POPCUSTOMS app on BigCommerce

① Click the link below to install our app

 https://www.bigcommerce.com/apps/popcustoms/ 

② Log in to your BigCommerce account

③ Click “Install”.

00162e8d715b65cd9d9f82902fd4c46

④ Click “Confirm“.

00162e8d7556d65f513bbfe867d8d33

Step 3: Connect your store

After you install the app, you’ll be asked to log into POPCUSTOMS accounts. Click Sign in then you will be taken to a new page to confirm the connection between your BigCommerce store and POPCUTOMS. Just click it to complete the connection.

00162e8d8904c87134f31db0c68aa79

Step 4: Add products to your store

Now you can click Products on the Dashboard page to design and add products to your store with just a few clicks. Start now to add your first product!

Step 5: Complete the Store settings after connection, including

一. Basic settings

二. Sync settings: ① Currency; ② Estimated profit rate; ③ Product status

三. Shipping settings

四. Billing method settings

Click this guide to check.

That’s all!

Note: Your BigCommerce orders will now be automatically imported into POPCUSTOMS.

Q: Can different branding options be applied to all products?

Different branding materials can only be applied to some specific products. You can filter and choose the branding materials which can be applied to your products. For example,

1) If you would like to design some branding materials for your shoe orders, you should tick General Brands and Shoes Brands, only these two types of branding materials meet your need.

2) For your other general order except for shoes, you should tick General Brands only and select the branding materials you want from them.

3) As to the Gift card, it suits all general orders.

Q: How do I add my billing information to my order invoice on your website?

You are allowed to download the invoice for each order and the monthly invoice for the one-month order. To add your billing information to our invoice, please go to your POPCUSTOMS Dashboard -> Account Settings-> Profile to fill in the Bill Name and Bill Address.

Here is an invoice sample for your reference,

Invoice Sample

Q: How to edit my order after it comes into POPCUSTOMS?

After your orders come in, you are still able to edit the order’s information like the product’s size, color, quantity, and design. However, please be sure that the product of your order is,

1) your design instead of our Sotocool design;

2) active on our website;

3) designed after Aug. 1st, 2022

Please follow the steps below to know how to edit your order if needed.

Step 1: Find your order to edit

Go to Dashboard -> Orders -> On hold to find the orders synced from your store, click the order number to see the order details and click Edit order to continue.

Step 2: Edit the order

① Edit basic product information

You can change the color, size, and quantity of the order. If your customer customizes a name or a text, you will see the customized text in the Note place.

 Edit the design

Click the Replace button to redesign and replace this product with your customers’ customize info.

After adding the customized text, click the Replace button in the right upper corner to save and replace it.

 Edit to add products to the order

When you occasionally need to add additional products to an order that has been synced to our site, click the Add product button to make it happen.

You can add products from My Designs or click Products to create a new product from scratch to add, you can also choose products from our Sotocool Designs.

Step 3: Save the changes and pay

Please don’t forget to click the Confirm button to save your changes and choose the shipping method again before you submit this order to pay.

That’s it!