Category Archives: Integrations

Q: WooCommerce troubleshooting for 403 / 404 / 500/ 503 / 504 / 524 / thumbnail errors

一. 403 / 404 Errors

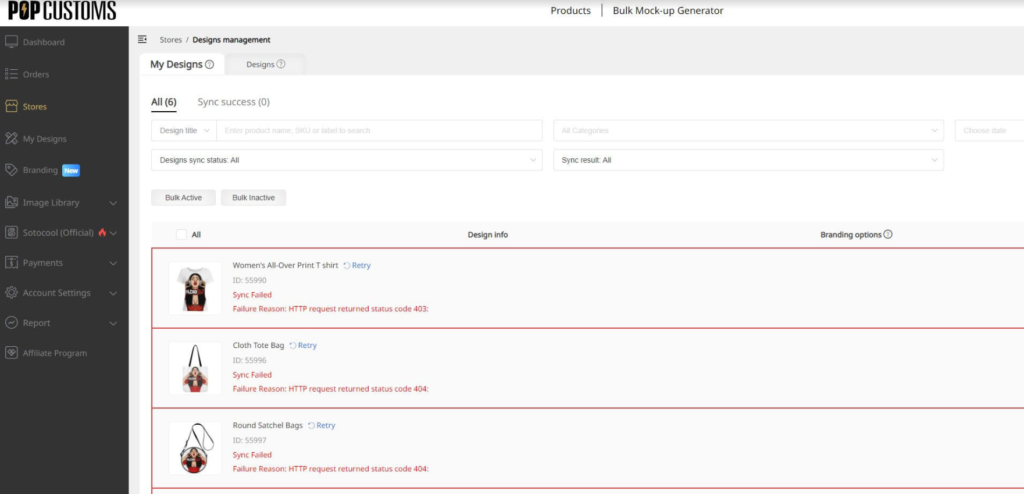
When you try to sync designs to your store but failed, the failure reason is shown below in the page “Store” -> “Synced designs”:

“HTTP request returned status code 403”

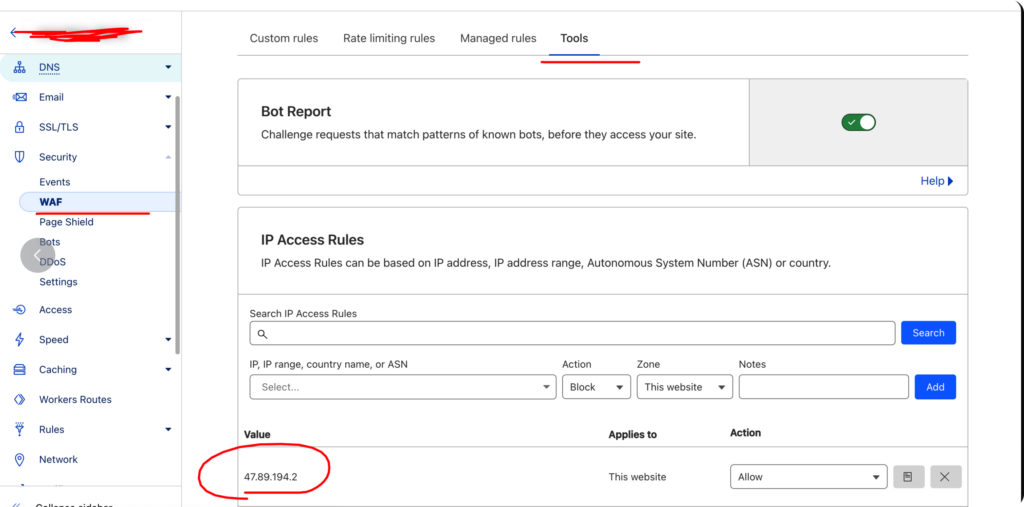
It occurs because your hosting provider prevents popcustoms.com from making requests to your store. To solve this problem, you should add our IP address 47.89.194.2 to the IP whitelist of Mod_Security or other security software. If you don’t know where to find the IP whitelist, please contact your hosting provider to ask for help.

for cloudflare users, you can follow the picture below.

Once IP added to whitelist, please click “Retry”. If the error still persists, please read on and contact us with the info mentioned below.

二. 500 / 503 / 504 / 524 Errors

If you sync designs to your WooCommerce store but fail, there comes up an error and state “There Has Been a Critical Error on Your Website” or other 5xx errors.

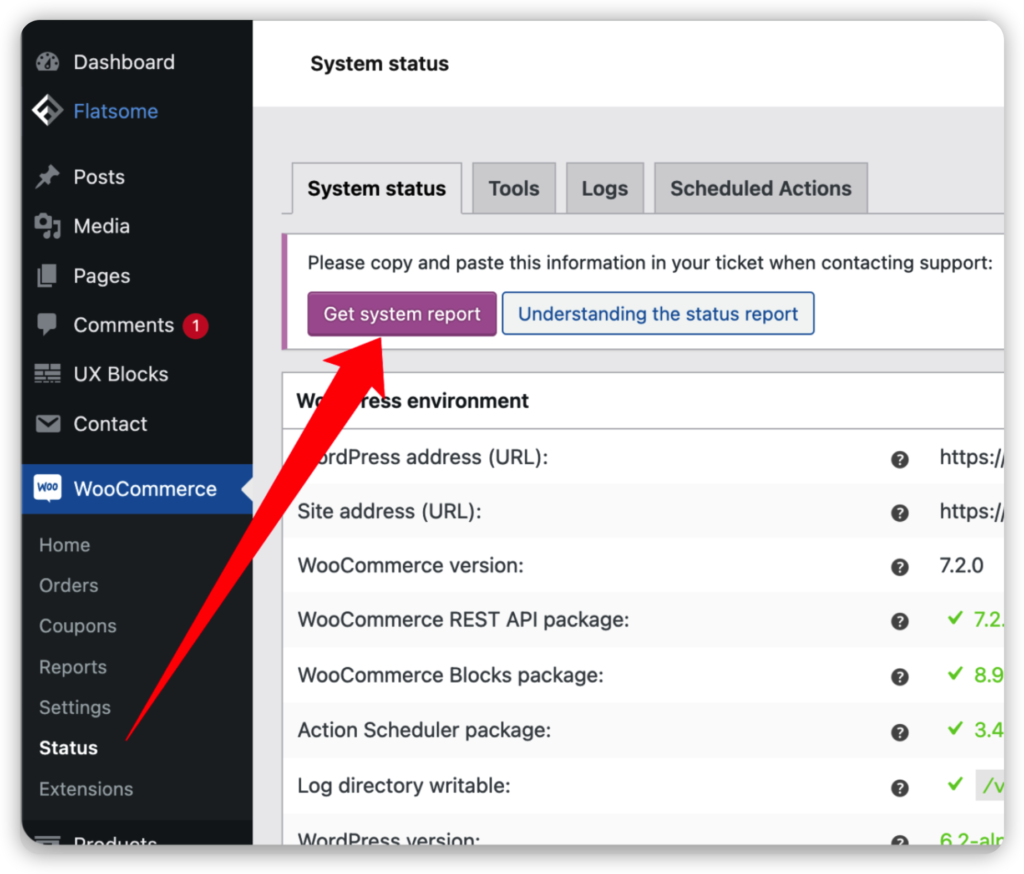
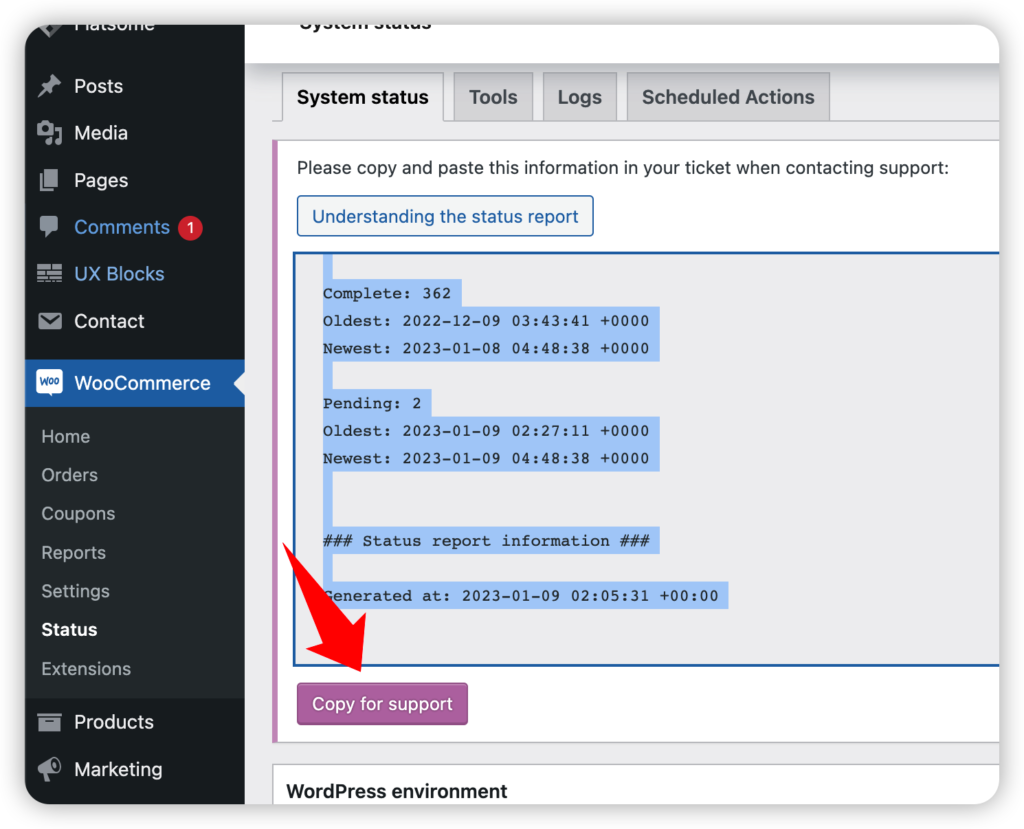
To solve this problem, please go to your WordPress Dashboard>WooCommerce>Status>System status>Get system report>Copy for support to copy the information and provide it to us.

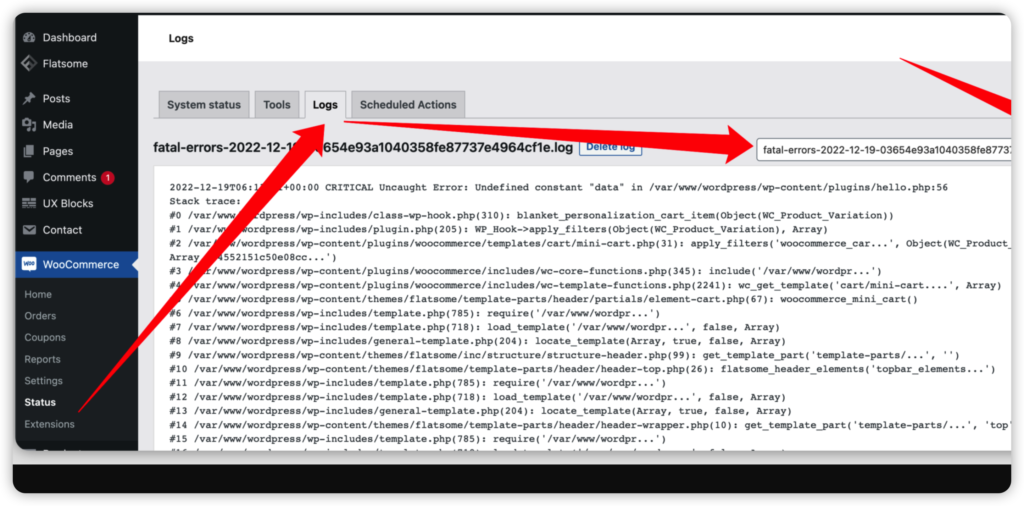
And then go to WooCommerce>Status>Logs to view and find the latest fatal-errors-2023-xx-xx log, copy and provide it to us.

Contact us at service@popcustoms.com to provide the information mentioned above, our IT support team, POP & WooCommerce project team members will help solve these problems asap.

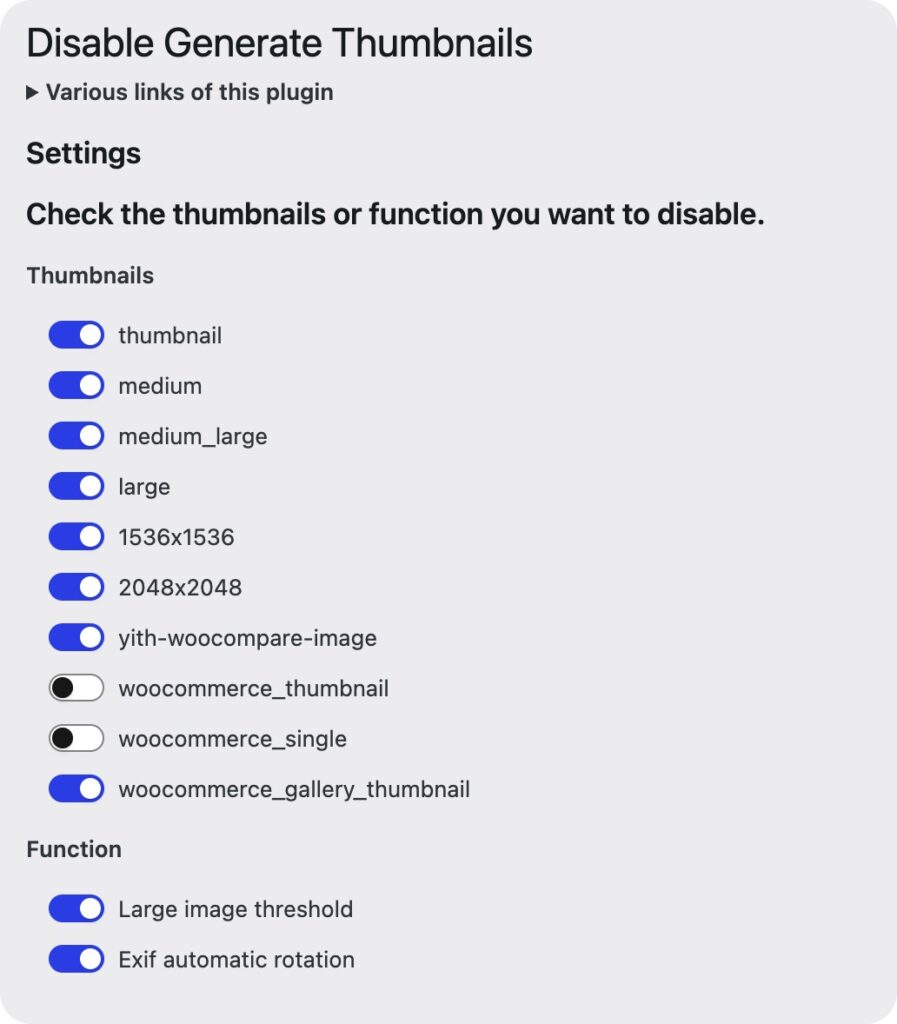
三. Class-wp-image-editor/ Fatal Error

When this type of error comes out, it means there’s an error in generating product thumbnails. Because of the execution time limit of your system, the product thumbnails can not be generated within the time limit. Under this condition, there are three solutions,

Solution 1: Disable some thumbnail sizes with this plugin https://wordpress.org/plugins/disable-generate-thumbnails/ it will help speed up the generation.

Solution 2: Extend the execution time limit of your system. Try this plugin https://wordpress.org/plugins/wp-maximum-upload-file-size/ and it may help extend the time limit to 600 seconds.

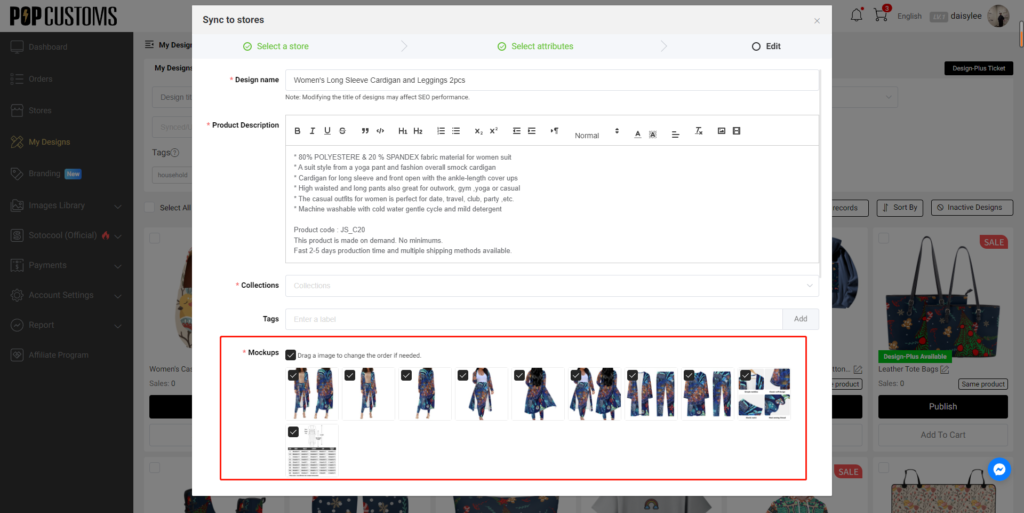
Solution 3: Use Publish feature instead of Sync feature to sync products to your WooCommerce store so that you can just select 2-3 mockups to save the generation time.

四. “Out of Stock” & No Variations Error

This error happens because we provide too many mock-up pictures, WooCommerce can’t handle all of them. Under this condition, please follow the steps below to solve it.

① Head to the Dashboard -> Stores at POPCUSTOMS to find your connected WooCommerce store, click the Synced designs to find the product that failed to show correctly in your storefront, and delete it.

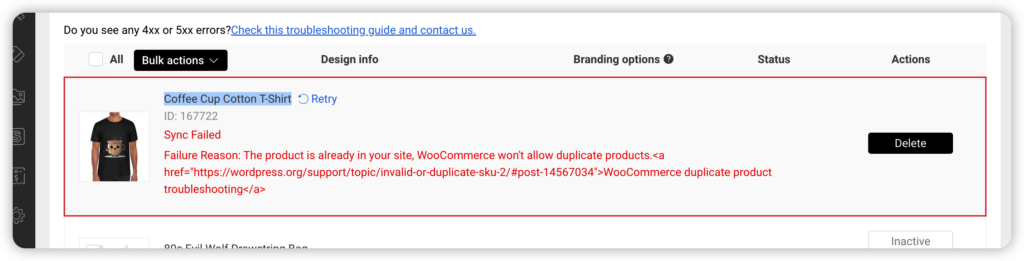
② Log into your WooCommerce to delete this product from your store as well, please go to the Trash to permanently delete it.

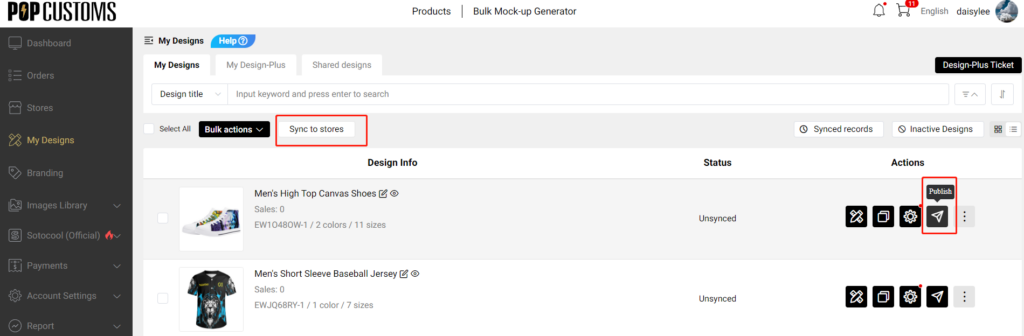
③ Go to POPCUSTOMS to publish this product to your WooCommerce store again, please don’t forget to delete some mock-ups in the final step so that the sync can be successful. Use the Publish button instead of Sync to stores button to sync products, and we don’t suggest you sync them in bulk.

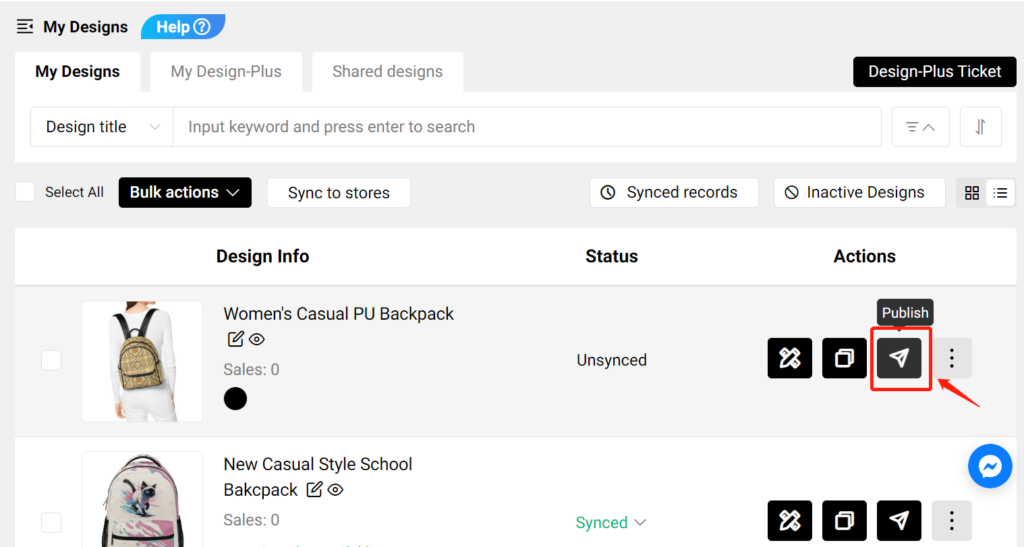
To avoid this issue, please kindly always use our Publish button to sync products to your WooCommerce store. At the same time, we suggest you only choose 3 or fewer mock-ups in the final steps during publishing.

Thanks.

Q: How to create a new Design-Plus product for personalization?

If our public Design-Plus products can’t meet your needs, you can create your own new Design-Plus products for personalization.

Pick a product to design first, and configure the design elements to make them personalizable by your customers. Please watch these two videos below to learn more.

We currently help you to create new Design-Plus products for personalization without additional charges. Try it out now!

Q: How do I set up a billing method for my store?

To ensure we can start working on your orders as soon as they come in, add a billing method so we can charge you for order fulfillment.

Please go to Dashboard -> Stores -> Settings to find the Billing method settings, choose Immediate automatic deduction, and add your credit or debit card.

Note: If you have balances in your POPCUSTOMS Wallet, we’ll deduct the order amount from your Wallet first. If it is not enough, we’ll then deduct the rest of the amount from the bound credit/debit card.

That’s all!

Q: How to sync products to my store?

If you want to sync our products to your store with one click, please follow the steps below to make it.

Step 1: Connect your store

Step 2: Design products

Step 3: Sync products to your store


Step 1: Connect your store

You should have a store on Shopify/ Etsy/ BigCommerce or Woocommerce first, then connect your store to POPCUSTOMS

*You can see the store integration tutorial here https://popcustoms.com/footer/how-it-works

Step 2: Design products

Select a product from our product page to design and save it.

Step 3: Sync products to your store

Go to My Designs to select designs, use Sync to Stores button to publish products, or click the Publish button to sync it.

001631155e8c107341cec3590e55f06

Note: If you have set many collections in your Shopify store admin but can’t find them here when syncing products, please check the collection type you set, it must be Automated type. Under this condition, please change the collection type to Manual then we can grab the collections data from your Shopify.

Q: How to deal with Your Etsy personalization order in POPCUSTOMS?

This video will guide you through how to process an order received from your Etsy store and submit it to POPCUSTOMS for production.

On Etsy, you can help your customer personalize items by turning on Personalization from the listing page.

In our last Product Syncing video (How to sync POD products to your Etsy store in POPCUSTOMS), we uploaded a L zipper purse to the Etsy store.

Now, let’s log in, click “Dashboard” – “Orders” – and “On hold”, you can see all the new orders you have received.

This is a personalization order and the customer would like to add the text “test” to the designed purse. 

Let’s click “Detail” to see all the information about this order. 

Then, click “Redesign” to modify it. If your customer wants to not only add text like a name, but also sent you a picture, you can unload here to make changes. 

Click “Update” when you are satisfied with the new mockup. 

Click “Confirm” if the attributes are correct. 

Click “Modify address”, here you can choose the shipping method.   

Click “Confirm” – “Back” to submit the order.  

You will find the submitted order in the “Unpaid”, click “Pay Order” to choose payment methods from Paypal, Stripe and Wallet. 

That’s it! This order will be submitted to POPCUSTOMS production system. Once shipped, you will be able to copy the tracking number on “Orders”. The tracking number will be synced to your Etsy store as well.

Q: How to avoid issues when using POPCUSTOMS products and designs on my Amazon account?

When you sync designs from POPCUTOMS to your Amazon store to sell, there is some need-to-know information:

① Some footwear is prone to infringement, please use them with caution.

② Change the product’s title, description, A+, etc. to make it different from that of POPCUSTOMS to avoid the risk of product association.

There are many sellers who run multiple stores on Amazon. If the products sold are basically the same in terms of categories, pictures, descriptions, operating practices, and other factors, then Amazon will most likely consider that there is an association between these accounts, and once the association is determined by Amazon, some listings will be forced to be taken down. If your account is unfortunately blocked, then you can submit your seller account information to Amazon through an appeal to prove that you are not selling the same products on multiple accounts.