Category Archives: Help Center

Q: Tiktok Orders to PopCustoms Site and Production

Option 1 :
Orders created through the TikTok shop need to be fulfilled on the Orders page in Shopify, then Shopify sync orders to POP. Then the IT department only needs to test Shopify’s synchronized order process, the customer downloads the tracking number to TikTok Shop.

Option 2 :
If you have any third-party order management app connected to your TikTok shop, like orderdesk or shipstation. Please contact us at busienss@popcustoms.com with details and we’ll test on our end.

Option 3 :
If no any third-party order management app is connected, POP thinks we’ll have to go for TikTok shop API.

TikTok shop has a seller developer which is just for your shop.

https://partner.tiktokshop.com/doc/page/63fd743e715d622a338c4e9c

please follow this guide to create a seller developer account for us. It’s required to provide the company information and seller verification, so, it’ll be easier for you to create the account.

Q: How are the POPCOMMERCE Store orders processed?

Your POPCOMMERCE Store orders will be automatically pushed to our production system after your customer paid for their orders.

POPCUSTOMS will produce the products, pack them, and arrange the shipment to your customers’ addresses directly.

Your customers pay for their orders to us and we send the profit you earn to your account. We also provide customer service support to your business.

Please feel free to contact us at business@popcustoms.com if you have any concerns.

Q: How do you collect all your eCommerce data with Google Analytics?

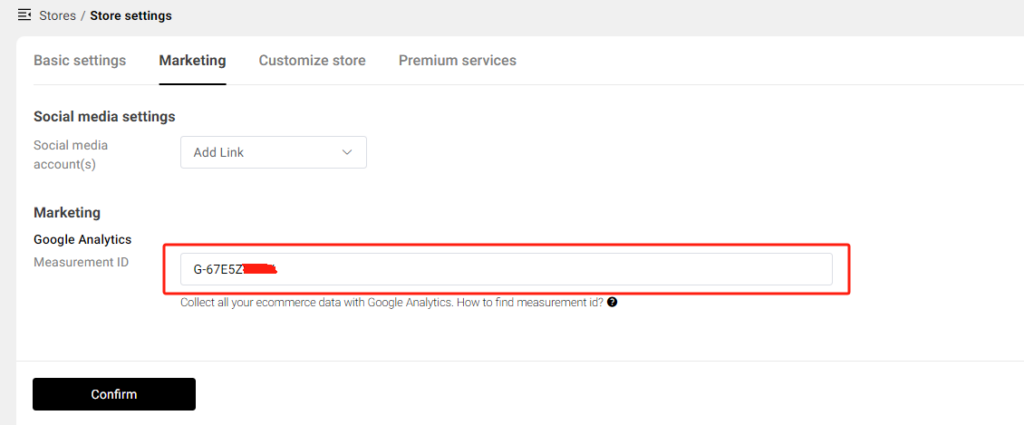
Integrating your POPCOMMERCE Store site with tools like Google Analytics can provide valuable insights into customer behavior and help you better understand your audience to improve conversion rate. To set it up, simply input the applicable Measurement ID in the Marketing settings of your POPCOMMERCE Store as following steps.

Step 1

Log into your Analytics account, go to Admin, create a property (for example, you can name it “My POPCOMMERCE Store”) and add your business details and objectives. Make sure to create a Google Analytics 4 property.

Step 2

Set up a data stream to start collecting data. Choose “Web” as your platform and enter the URL of your primary website, e.g., “demo.popcustoms.me”, and a Stream name, e.g. “My POPCOMMERCE Store (web stream)”.

Step 3

Once done, simply copy the Google tag (“G-xxxxxxx” tracking ID) and back to POPCOMMERCE Store Settings – Marketing g- Google Analytics – Measurement ID and Paste into the box. That’s all.

For detailed setup instructions, please visit this article.

Note: If you previously created a Universal Analytics (“UA-” tracking ID) property for your POPCOMMERCE Store, please note that UA properties will stop processing data from July 2023. It is strongly recommended to manually migrate your Universal Analytics settings to GA4. Please visit this article for more information.

Q: How will my POPCOMMERCE Store earnings be paid out?

Your POPCOMMERCE Store earnings can be withdrawn to your Wallet at POPCUSTOMS with no time and amount limit. The credit balance in your Wallet can be used to pay for products and services on POPCUSTOMS.

You are also allowed to withdraw to your Payoneer account by following the rules below,

Rules:

1. Withdrawal to Payoneer account is only possible when the withdrawal amount is at least $100.00.

2. The first 3 withdrawals per month are free of charge, and the 4th withdrawal is subject to a handling fee.

  • Withdrawal amount <$3000, handling fee $10 required.
  • Withdrawal amount $3000 ~ $5000, handling fee $15 required.
  • Withdrawal amount $5000 ~ $10000, handling fee $20 required.
  • Withdrawal amount >$10000, handling fee $25 required.

Don’t have a Payoneer account? Click here to sign up.

To receive your earnings, please ensure that you have submitted your Payoneer account details correctly.

Note: You are unable to withdraw your earnings to your Payoneer account until it reaches $100.00.

Q: How to create a POPCOMMERCE Store?

There have Something Important you need to note before starting POPCOMMERCE SERVICE:

  1. One account is limited to ONE POPCOMMERCE Store.
  2. Only 50 designs can be synchronized to your POPCOMMERCE Store.
  3. Inactivity Criteria: We will automatically close stores that have not synchronized finished products in 180 days.

Charges:

It is totally free for you to use our POPCOMMERCE service. However, when your store has an order, we will charge 8% of Your Profit as commissions, that is “Your Profit * 8%”.

Your Profit = Total amount (paid by your customers to POPCUSTOMS) – Product’s cost – Shipping cost – Payment Processing Fee

Note: Payment processing fee ranges from 3.3% to 3.9%+0.3$

Please note above! Lets start it!

Launch Your POPCOMMERCE Store with Just a Few Clicks by Following Steps:

Step 1: Named your POPCOMMERCE Store

Let’s start with adding a store name here. Your POPCOMMERCE Store URL will contain the store name, so it must be unique. The store name can be changed anytime if you need.

For example, if your store name is “perfectto”, then your store URL will be: perfectto.popcustoms.me

Step 2: Add store details

Next, go to “Stores” in your POPCUSTOMS account scroll down the page and click “Create your own website in seconds”. Then, enter your store name and DNS setup will be auto finished, select the POPCOMMERCE Store option and add all the necessary information.

Step 3: Choose a theme

Then, select one of our store themes. In case you later decide that the originally picked theme is not working for you, don’t worry—you can change it at any time. Then, click Save and Launch POPCOMMERCE Store.

Step 4: Create and publish products

Now that the POPCOMMERCE Store is created, you can publish any previously created products or create new ones.

Please note that: Currently we only allow your POPCOMMERCE Store to sync 50 designs to your store.

To add items to your store, go to our catalog and choose a product. Then, click “Start Creating” option, add your design to product, and publish it to your POPCOMMERCE STORE.

Your store is all set! Copy the store link to share it with your friends, family, or social media.