We’re using “Gemini 2.5 Flash Image Preview (Nano Banana)” AI to create mockups. We choose https://openrouter.ai/ as the service provider. You’ll sign up, buy credits and get api key from openrouter to use AI mockups at popcustoms.com.
Here is the step-by-step tutorial:
1, select gmail to sign in. It’ll sign you up if the account doesn’t exist.
2, grab api key
Profile (right top) -> Keys -> Create API Key
fill popcustoms as name and then hit create
copy and paste into popcustoms
3, back to openrouter, you’ll add credits to openrouter
Sellers can tailor mockups to align with your brand identity, ensuring consistency across your product presentations by using our Mockup Templates Feature. Reorganize POPCUSTOMS’ existing mockups and generate your own by following the steps below,
Step 1
Create a POPCUSTOMS Account
Sign up for a free account at POPCUSTOMS.
Step 2
Design Products
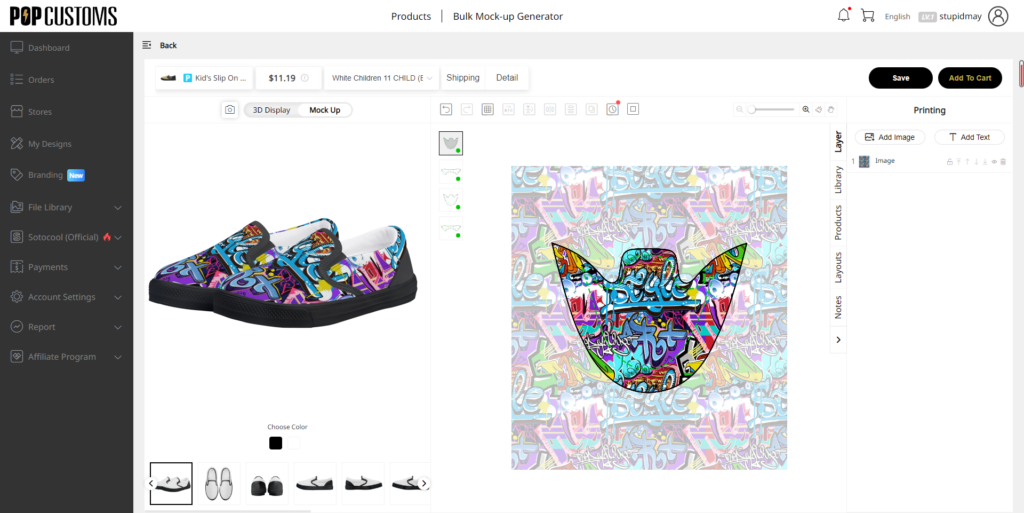
Choose a product from over 475 options to design.
Step 3
Generate Own Mockup Templates
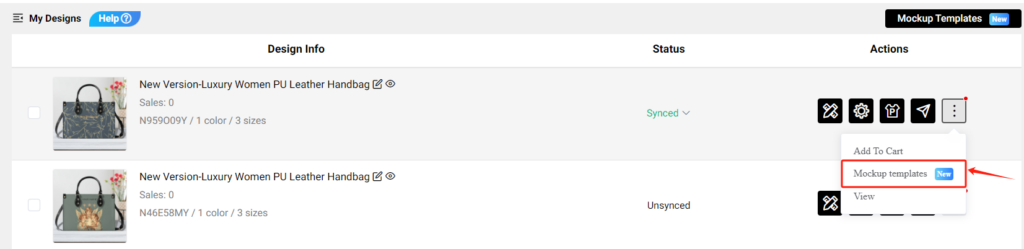
Go to Dashboard – My Designs, click ︙ – Mockup Templates – Add new template to generate your own mockup templates for your design.
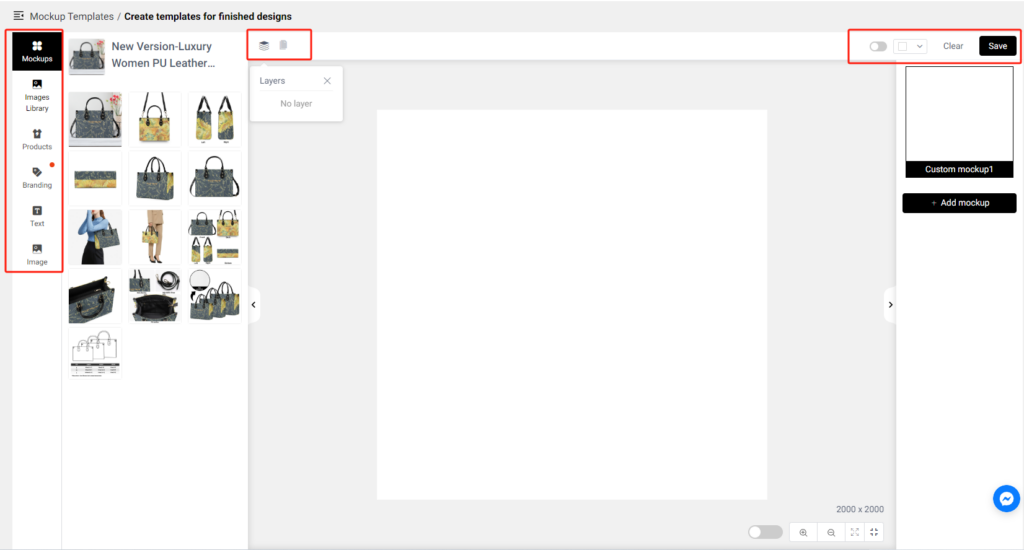
On the left and above are the action bars and action buttons,
Mockups: There are existing mockups that you can choose from and reorganize.
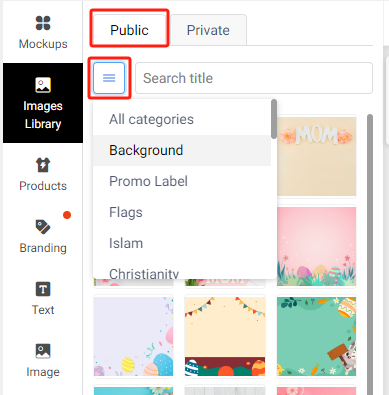
Image Library- Private: You can upload your own image or choose the image you uploaded before to use.
Image Library- Public: Free image categories to choose from and use, for example, Background image, Promo Labels and so on.
Products: Switch and choose another product to generate new custom mockup templates easily
Branding: Allow to add your branding items to your new custom mockup templates to show your customers
Text: Add text to your template, especially for personalized products, you can add like “NAME CAN BE CHANGED” etc.
Image: Another place for you to upload your own image
Background color: A button in the top right corner, you can use it to change the background color if you don’t want to upload a background image.
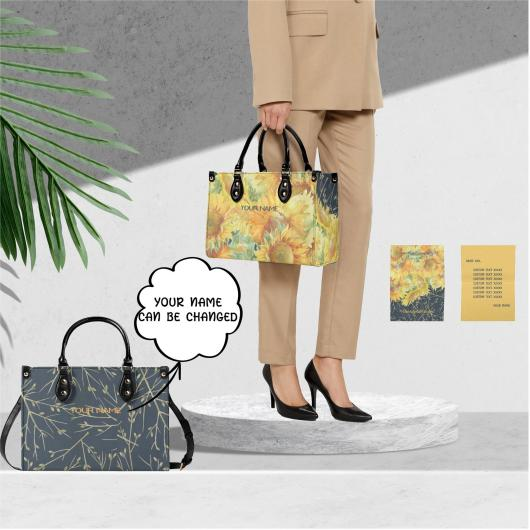
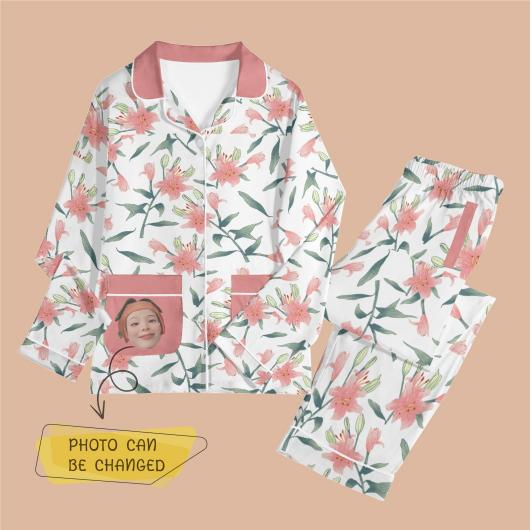
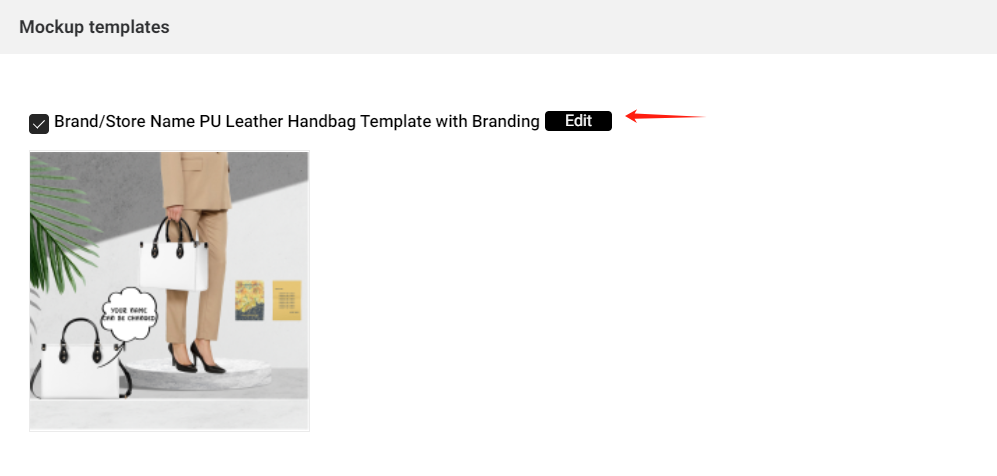
Some examples for your reference,
Step 4
Edit Mockup Templates
Click the Mockup Templates – Edit to edit it as needed.
Something important to know:
The mockup templates of products will be saved as BLANK design so this template can be applied to different designs of the same product. However, the branding item in the mockup templates is saved with your design on it. You have to edit and update the branding item if there’s any changes.
Background removal will be applied to some of our existing mockups for a better using experience when you create your own custom templates.
We suggest you name the customer mockup templates appropriately for future use.
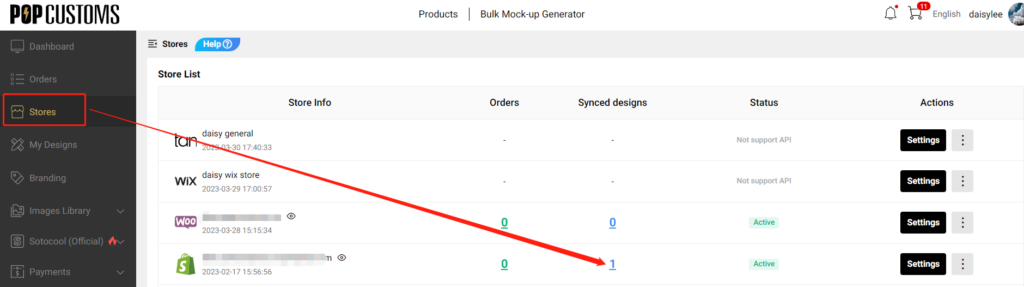
If there’s anything changed to the branding items, you should edit your mockup template first and then go to Dashboard – Stores – Synced designs to find the product, edit and update the mockups in your store.
The Mockup Templates feature is only applied to your own designs or Design-Plus products, public designs are excluded.
Introduction of different Mockup Templates entrances:
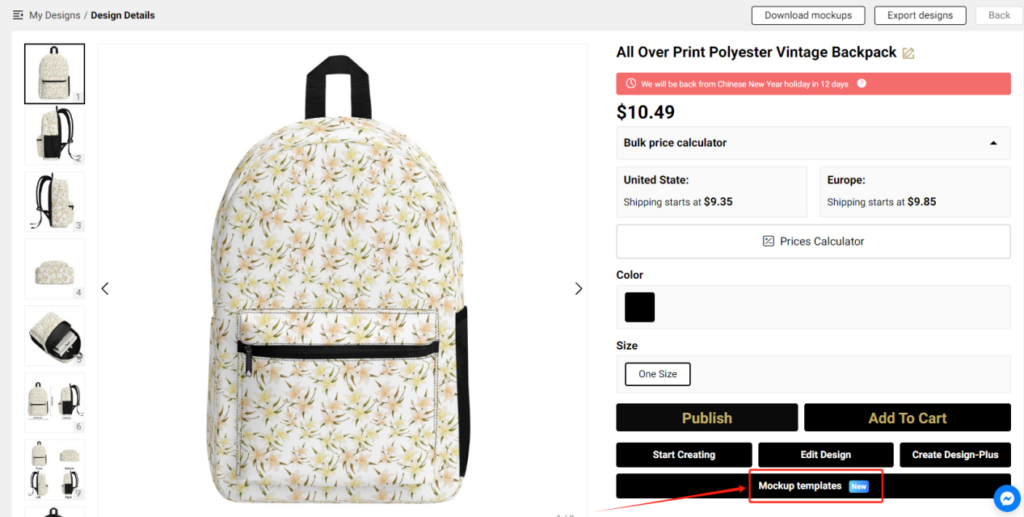
After saving your design, you’ll see a Mockup Templates button at the progress bar.
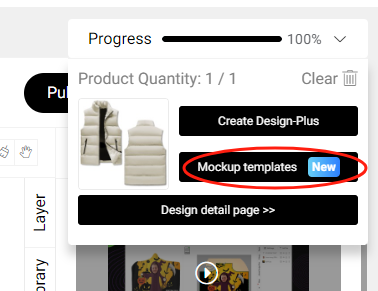
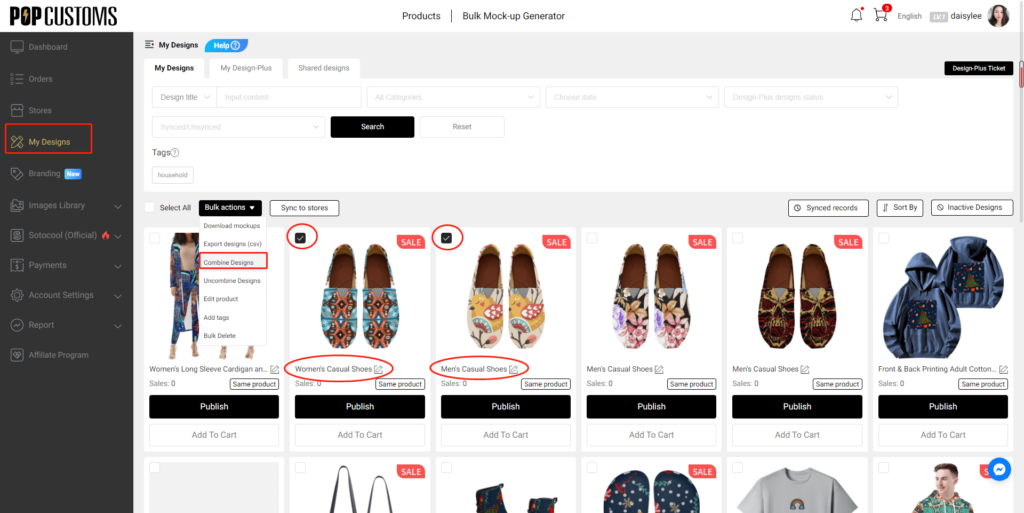
On Dashboard – My Designs page, there are 3 entrances to the Mockup Templates feature.
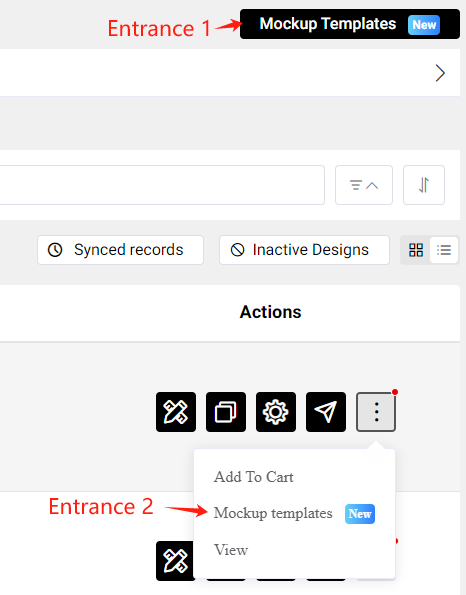
* Existing mockups are plain white without designs if you enter through the entrance 1.
It’s essential to note that POPCUSTOMS currently offers a shipping rate of $0.00 for products shipped to the United States, which means the prices displayed on the website include free shipping for that region. You can also configure shipping rates for other countries and regions based on POPCUSTOMS’ shipping policies.
And pls kindly note that if shipping rates are not set up, there may be display issues with out of stock/sold out after product synchronization.
Here’s a guide to help you set up shipping rates for POPCUSTOMS products in your Shopify store.
Step 1: Access Shipping Settings
Go to your Shopify admin page. From the left-hand menu, click on the Settings option.
Then, click on Shipping and Delivery.
Shipping and delivery – General – Manage
Step 2: Create or Edit Shipping Zones
In the Shipping and Delivery page, locate the Shipping Zones section.
If you already have shipping zones created, select the one you wish to edit. If not, click the Create Shipping Zone button.
Step 3: Set Up Shipping Rates
In the shipping zone area, look for the option to Add Rate.
Click on the Add Rate button.
Example Setup:
United States:
Name: Free Shipping to the U.S.
Rate: $0.00 (since POPCUSTOMS offers free shipping to the U.S.)
Mexico:
Name: Shipping to Canada
Rate: $3.00 (set according to POPCUSTOMS’ policy)
European Union:
Name: Shipping to EU
Rate: $0.00 (set according to POPCUSTOMS’ policy)
Other Regions:
Name: Shipping to Other Countries/Regions
Rate: $9.99 (set according to POPCUSTOMS’ policy)
Download POPCUSTOMS’ product shipping rates to help you set up better shipping rates!
Step 4: Save Changes
After confirming all your shipping rate settings, don’t forget to click the Save button in the upper right corner to save your changes.
Step 5: Test Shipping Calculation
Once you’ve completed the setup, it’s a good idea to conduct a test:
Simulate a purchase in your Shopify store.
Add a POPCUSTOMS product to your cart and proceed to the checkout page.
Double-check that the shipping rates display correctly based on the selected region.
Step 6: Sync with POPCUSTOMS
Make sure you sync your product information and shipping rates with POPCUSTOMS to avoid any discrepancies:
Log in to your POPCUSTOMS account.
Ensure that your shipping-related settings are updated in your Shopify product sync records.
POPCUSTOMS Shipping Zone Information
For more details about POPCUSTOMS shipping zones, please visit this link: POPCUSTOMS Shipping Zone.
Please feel free to contact us at business@popcustoms.com if you need any assistance.
Generally, when you publish our products to your Shopify store, the color values will be the base color of the product template rather than the color of your designs.
If you combine different designs of the same product and want to change the color options of the products shown on your storefront, please follow the steps below.
Publish combined products to your store first but set it Inactive. Since Shopify allows sellers to create up to 100 variants for a product, we suggest you check the variants of products before you combine and publish them. For shoes, we suggest you combine at most 4 of them.
Learn more about the variants’ limitations on Shopify here.
Step 2: Modification color value on Shopify
Log in to your Shopify admin, click Products to find the combined product, and click it to modify the Option name and Option values of the product.
For example, I change those two values mentioned above as below,
And then save the changes, set the product’s status to Active. That’s what it looks like on your storefront.
If you sync products to your store but they don’t show in your storefront, please click Stores -> Designed products -> Failed to find the reason.
We collect some reasons and solutions for your reference,
1- Exceeded the maximum number of variants allowed
If you have 50,000 or more variants/SKUs in your store, you’re subject to Shopify daily rate limit: 1,000 variants/SKUs per day. If you’re on the Shopify Plus plan, then the limit doesn’t apply to you. For a product, you can create up to 100 variants/SKUs. If you exceed the maximum number of variants allowed in Shopify, the product cannot be synced to your store. Under this condition, you must separate the product into two or more products to sync to your Shopify store.
Stores with 50000 or more variants are subject to a daily rate limit for uploading variants by using an app or CSV file import. You can add up to 1000 new variants in a day before the limit is reached. If you exceed this limit, then an error is displayed and you need to wait 24 hours to add products to your store again. Plus stores are exempt from this limit.
Click here to learn more about the rules of the variant on Shopify.
2- Collections show “No Data”
When you try to sync products to your store but there is no collection data for you to choose from. To solve this problem, you should go to your Shopify store admin to change the Collection type from Automated to Manual.
3- The status of your synced products is Inactive
Go to your Dashboard>Stores, find your Shopify store, and then click the content under Synced designs to find it,
If the status of your synced designs is Inactive, change it to Active then it will show in your storefront successfully.
To avoid this issue happens again, we suggest you allow all synced designs from our site to your store to publish automatically in your store. Go to Stores-> Settings to complete this setup as follows.
4- Delete products from my Shopify and can’t sync them again
When you delete a product from your Shopify admin page, you have to delete the previous sync record from POPCUSTOMS as well.
Then you can go to My Designs to find this product to resync it again to your Shopify store.
Want POPCUSTOMS to produce your Amazon custom orders? You should,
Step 1: Create an Amazon store
Step 2: Upload the font file
Step 3: Download the order report from Amazon
Step 4: Modify SKU
Step 5: Import to POPCUSTOMS
Please follow the steps below to import your Amazon customs orders to POPCUSTOMS.
Step 1: Create an Amazon store
Create an Amazon store in POPCUSTOMS first. Name the store and click the confirm button to save it.
Step 2: Upload the font file
Go to your Amazon store, open the custom order and click Customization Information.
Click Download font.
Back to POPCUSTOMS, click Stores, find your Amazon store, then click the store settings button.
Click Upload font, select the font downloaded from Amazon custom order to upload. The same font only needs to be uploaded once.
Step 3: Download the order report on Amazon
Go to your Amazon store, Click Orders -> Order Reports button to download the order report.
Step 4: Modify SKU
*If you’ve used our website SKUs when setting up your Amazon products SKUs, then you can skip this step.
Open the downloaded order report in excel and find the SKU column. These SKUs have to be changed.
Go back to POPCUSTOMS, and click “My Designs” to find the designed product of your order. You can directly save blank design products, use the product SKU without design because you will import Amazon orders to POPCUSTOMS, we can extract Amazon customers’ custom information from the backend and process it for you.
Click the Attributes button to see the SKU of the product, copy the SKU to use.
*If the product has more than one size, different sizes will have different SKUs. Check the product and the size in your order, and find the correct SKU to avoid mistakes.
Paste and replace the corresponding SKUs into the SKU column of the Amazon order report you downloaded. Save this order report and change the format to .xlsx.
Note: If there are 2 products with the same sku in the same order-id, you need to add a suffix to the order-id to distinguish them, otherwise the system cannot recognize that there are 2 products. Take the following order as an example, you can add -1/-2 to the suffix of the order-id as a distinction, after the order is imported to POPCUSTOMS, then make a note of 113-3253820-8999466-1 and 113-3253820-8999466-2 ship together.
Step 5: Import to POPCUSTOMS
Back to the POPCUSTOMS Dashboard, click Orders, find Import Orders, and select Amazon Custom Orders to import your order report.
Here you should select the store first, choose the shipping of your orders and then upload the Amazon order report. Finally, click the Confirm button to import.
If you choose the shipping “Manually select for each order“, then these orders will be imported to the “On hold” status. You need to click Change Shipping to select the shipping method for each order.
Submit your orders and click confirm,
then your orders will be in “All” status. Select your orders and pay for them, and we will arrange to produce your orders right away.
Sure thing. You can duplicate your designs on POPCUSTOMS, edit the copy to change or add designs or make changes to selected variables (i.e. size, color, description, branding options).
Follow the steps below,
1- Go to Dashboard -> My Designs
2- Switch to List Mode
3- Click the Duplicate icon
4- Edit the design to update it or save it as a new one